
Step-by-Step: Creating Your First Automated Plant Watering System using ESP8266
Never let your plants die again! Build a smart IoT-based irrigation system with NodeMCU ESP8266
Introduction
Are you tired of forgetting to water your plants? Do you worry about your garden while you're on vacation? In this comprehensive guide, we will walk you through building your very own Automated Plant Watering System using the powerful ESP8266 NodeMCU microcontroller.
This IoT-enabled system automatically monitors soil moisture levels and activates a water pump when your plants need hydration. With WiFi connectivity, you can even monitor and control your garden remotely using your smartphone!
What You Will Learn
- Understanding ESP8266 NodeMCU and its capabilities
- Working with capacitive soil moisture sensors
- Controlling high-power devices using relay modules
- Programming ESP8266 with Arduino IDE
- Building a complete automated irrigation system
Components Required
Main Controller
- NodeMCU ESP8266 Development Board
- USB Cable (Micro-USB)
Sensors
- Capacitive Soil Moisture Sensor v1.2
- Jumper Wires (Male-to-Female)
Control & Power
- 5V Single Channel Relay Module
- Mini DC Submersible Water Pump (3-6V)
- External Power Supply (5V/12V)
Additional Items
- Silicone Tubing (for water flow)
- Breadboard (for prototyping)
- Water Container/Reservoir
Pro Tip: Use a capacitive soil moisture sensor instead of resistive ones for better corrosion resistance and longer lifespan!
How the System Works
Working Principle:
- Soil Sensing: The capacitive soil moisture sensor continuously measures the moisture content in the soil.
- Data Processing: ESP8266 reads the analog value from the sensor and converts it to a percentage (0-100%).
- Decision Making: When moisture drops below a set threshold (e.g., 30%), the system triggers the relay.
- Watering: The relay activates the water pump, delivering water to the plant for a specified duration.
- Auto-Stop: Once moisture reaches the desired level, the pump automatically turns off.
Circuit Diagram & Connections
Follow this detailed circuit diagram to connect all components correctly. Click on the image to view in full size.
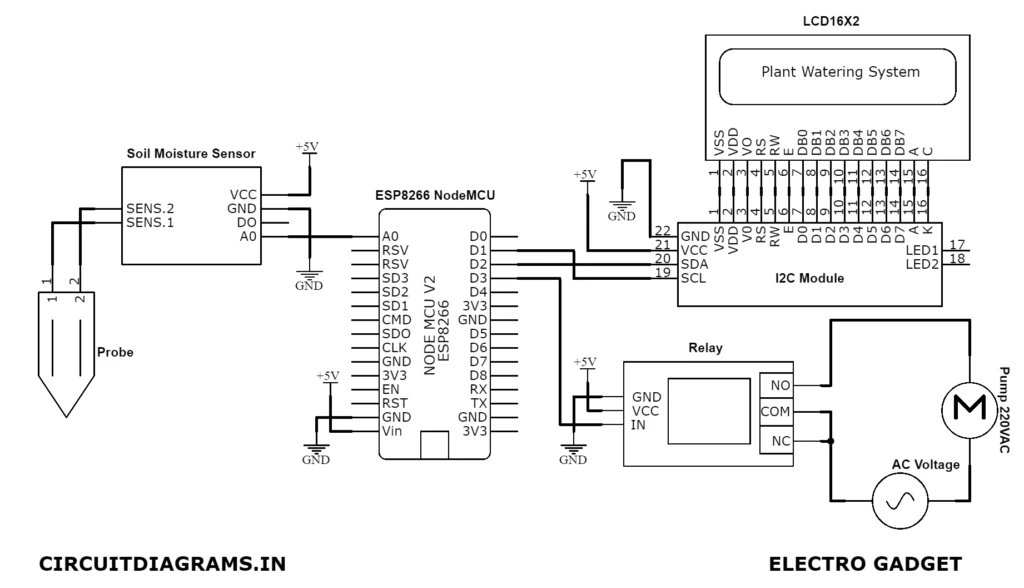
Figure 1: Complete Circuit Diagram for IoT Plant Watering System using ESP8266
Connection Details:
1. Soil Moisture Sensor to NodeMCU:
| Sensor Pin | NodeMCU Pin | Wire Color |
|---|---|---|
| VCC | 3.3V | Red |
| GND | GND | Black |
| A0 (Analog Output) | A0 | Yellow |
2. Relay Module to NodeMCU:
| Relay Pin | NodeMCU Pin | Function |
|---|---|---|
| VCC | Vin (5V) | Power Supply |
| GND | GND | Ground |
| IN (Signal) | D1 (GPIO5) | Control Signal |
3. Water Pump Connections:
- Pump Positive (+): Connect to Relay COM (Common) terminal
- Pump Negative (-): Connect to External Power Supply Negative
- Power Supply Positive (+): Connect to Relay NO (Normally Open) terminal
- Power Supply Negative (-): Connect to Pump Negative
Step-by-Step Hardware Assembly
1 Prepare the NodeMCU
Start by placing your NodeMCU ESP8266 on the breadboard. Ensure the USB port is accessible for programming. Connect the board to your computer via USB cable to verify it's working - the onboard blue LED should blink when powered.
2 Connect the Soil Moisture Sensor
Insert the capacitive soil moisture sensor probe into the soil of your plant pot. Connect the three wires from the sensor module to the NodeMCU as shown in the connection table above. The analog output will give you readings between 0 (dry) and 1024 (wet).
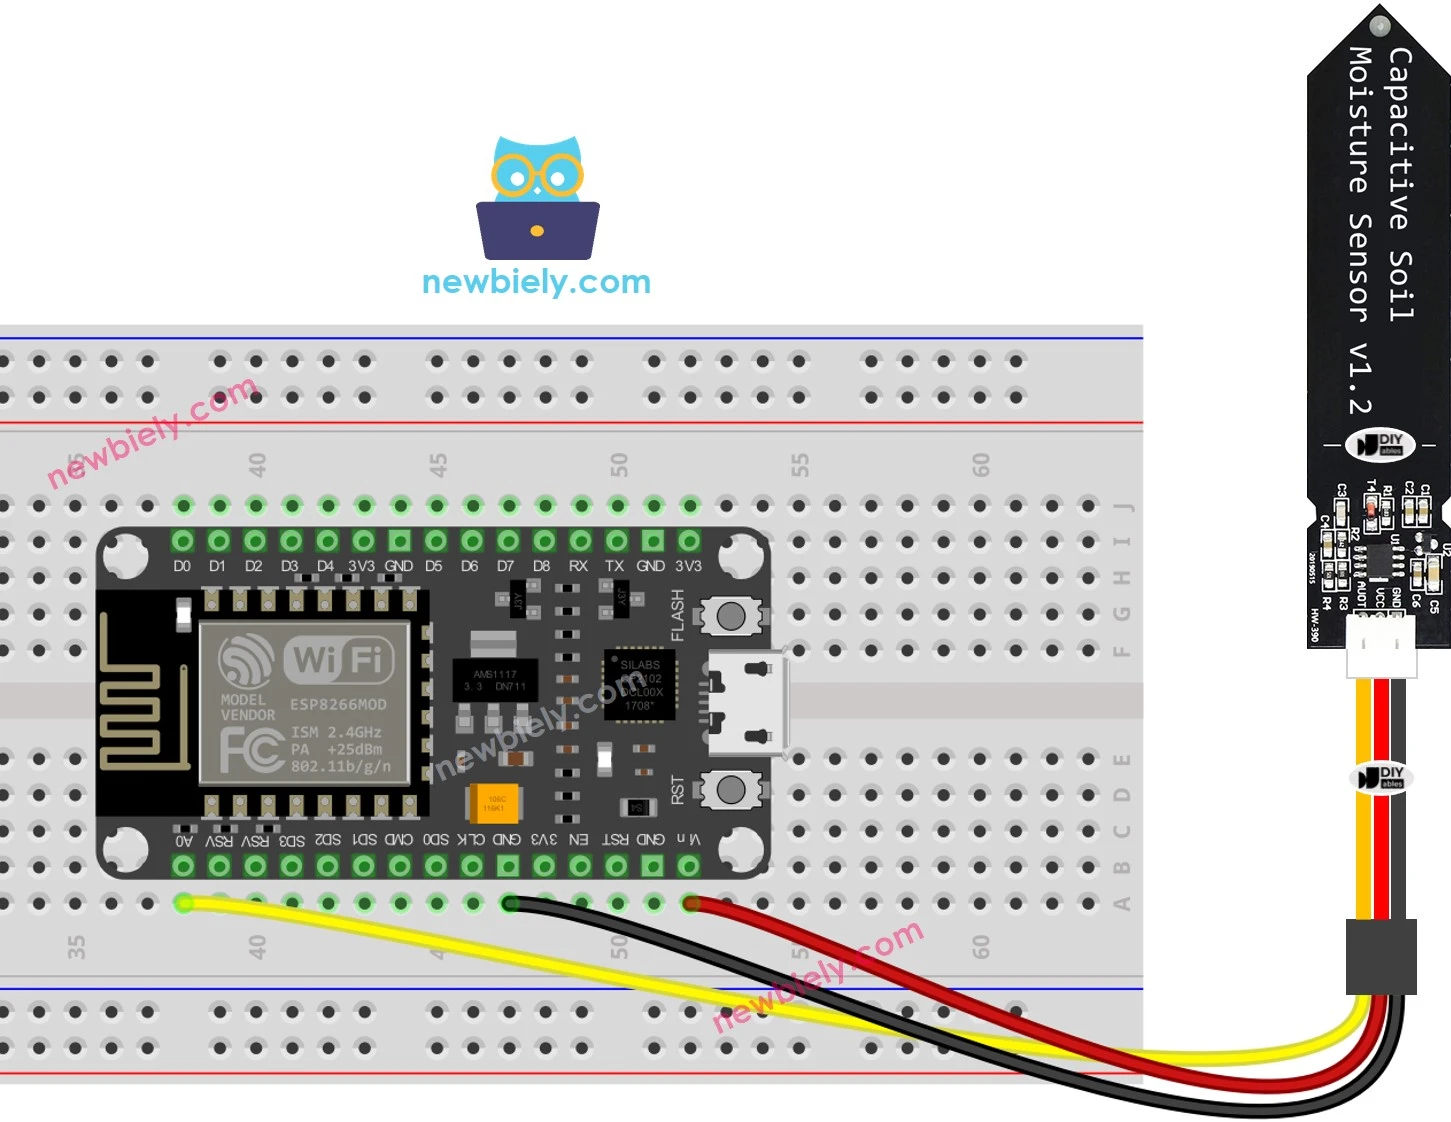
Figure 2: Soil Moisture Sensor Wiring with ESP8266
3 Setup the Relay Module
Connect the relay module to NodeMCU pins D1, GND, and Vin. The relay acts as an electrically operated switch that allows your low-power microcontroller to control high-power devices like the water pump safely.
4 Install the Water Pump
Place the submersible water pump in your water reservoir. Connect one tube from the pump outlet to your plant pot. Ensure the pump is fully submerged in water before operation to prevent damage.
5 Power Connections
Power the NodeMCU via USB or Vin pin with 5V. For the water pump, use an external power supply (5V or 12V depending on your pump specifications) connected through the relay module. Never exceed the voltage rating of your pump!
Arduino IDE Setup & Programming
Step 1: Install ESP8266 Board Support
- Open Arduino IDE (Download from arduino.cc if not installed)
- Go to File > Preferences
- In "Additional Board Manager URLs", add:
https://arduino.esp8266.com/stable/package_esp8266com_index.json - Go to Tools > Board > Board Manager
- Search "ESP8266" and install the package
- Select NodeMCU 1.0 (ESP-12E Module) from Tools > Board menu
Step 2: Upload the Code
Copy and paste this complete code into your Arduino IDE:
/*
  Automated Plant Watering System using ESP8266
  Created for FlyRobo.in
  Features: Auto-watering based on soil moisture, WiFi monitoring, Manual override
*/

// Pin Definitions
#define SOIL_SENSOR A0        // Analog pin for soil moisture sensor
#define RELAY_PIN D1          // Digital pin for relay control
#define LED_PIN D4            // Built-in LED for status indication

// Configuration Variables
const int DRY_VALUE = 800;    // Analog reading when soil is dry (calibrate this!)
const int WET_VALUE = 400;    // Analog reading when soil is wet (calibrate this!)
const int THRESHOLD = 30;     // Moisture percentage threshold to trigger watering
const int PUMP_DURATION = 5000;  // Pump run time in milliseconds (5 seconds)

// Global Variables
int soilMoistureValue = 0;
int moisturePercentage = 0;
bool pumpStatus = false;
unsigned long lastCheck = 0;
const int CHECK_INTERVAL = 2000;  // Check moisture every 2 seconds

void setup() {
  // Initialize Serial communication
  Serial.begin(115200);
  delay(1000);
  Serial.println("=== Automated Plant Watering System Starting ===");

  // Configure pins
  pinMode(RELAY_PIN, OUTPUT);
  pinMode(LED_PIN, OUTPUT);
  digitalWrite(RELAY_PIN, LOW);  // Ensure pump is OFF initially
  digitalWrite(LED_PIN, HIGH);   // LED off (active low on NodeMCU)

  Serial.println("System Initialized. Monitoring soil moisture...");
  Serial.println("Dry Value Threshold: " + String(DRY_VALUE));
  Serial.println("Wet Value Threshold: " + String(WET_VALUE));
  Serial.println("Trigger Threshold: " + String(THRESHOLD) + "%");
}

void loop() {
  unsigned long currentMillis = millis();

  // Check soil moisture at regular intervals
  if (currentMillis - lastCheck >= CHECK_INTERVAL) {
    lastCheck = currentMillis;
    readSoilMoisture();

    // Display current status
    Serial.print("Soil Moisture: ");
    Serial.print(moisturePercentage);
    Serial.print("% | Raw Value: ");
    Serial.print(soilMoistureValue);
    Serial.print(" | Pump: ");
    Serial.println(pumpStatus ? "ON" : "OFF");

    // Automatic watering logic
    if (moisturePercentage < THRESHOLD && !pumpStatus) {
      Serial.println(">>> Soil too dry! Activating water pump...");
      activatePump();
    }
  }
}

void readSoilMoisture() {
  // Read analog value from sensor
  soilMoistureValue = analogRead(SOIL_SENSOR);

  // Map the analog value to percentage (0-100%)
  // Note: Lower analog value = Higher moisture for capacitive sensors
  moisturePercentage = map(soilMoistureValue, DRY_VALUE, WET_VALUE, 0, 100);

  // Constrain values between 0 and 100
  moisturePercentage = constrain(moisturePercentage, 0, 100);
}

void activatePump() {
  pumpStatus = true;
  digitalWrite(RELAY_PIN, HIGH);   // Turn ON relay (active HIGH)
  digitalWrite(LED_PIN, LOW);      // Turn ON status LED

  Serial.println("Pump activated. Watering in progress...");

  // Keep pump running for specified duration
  delay(PUMP_DURATION);

  // Turn off pump
  digitalWrite(RELAY_PIN, LOW);    // Turn OFF relay
  digitalWrite(LED_PIN, HIGH);     // Turn OFF status LED
  pumpStatus = false;

  Serial.println("Pump deactivated. Waiting for next check...");
  Serial.println("----------------------------------------");
}

// Function to manually trigger watering (can be called from serial commands)
void manualWatering() {
  Serial.println("Manual watering triggered!");
  activatePump();
}
Calibration Instructions:
- Upload the code and open Serial Monitor (Tools > Serial Monitor, set baud rate to 115200)
- Take the sensor probe out of soil and note the reading - this is your DRY_VALUE
- Place the probe in a glass of water and note the reading - this is your WET_VALUE
- Update these values in the code and re-upload
- Test the system by placing the sensor in dry soil - the pump should activate!
Testing & Troubleshooting
Expected Behavior
- System starts and prints initialization message
- Moisture readings appear every 2 seconds
- When soil is dry (<30%), pump runs for 5 seconds
- Status LED lights up when pump is active
- System waits between watering cycles
Common Issues & Fixes
- Pump not running: Check relay connections and external power supply
- Erratic readings: Ensure sensor wires are not loose; use shielded cables
- False triggering: Calibrate DRY_VALUE and WET_VALUE properly
- Relay clicking but no pump: Check pump power supply voltage
- Upload errors: Hold FLASH button while uploading, check COM port
Advanced Features (Optional)
Add WiFi Monitoring with Blynk App
Want to monitor your plants remotely? Integrate the Blynk IoT platform:
- Download Blynk app from Play Store/App Store
- Create a new project and get your Auth Token
- Install Blynk library in Arduino IDE (Sketch > Include Library > Manage Libraries)
- Add WiFi credentials and Blynk token to your code
- Create dashboard with gauges for moisture level and buttons for manual control
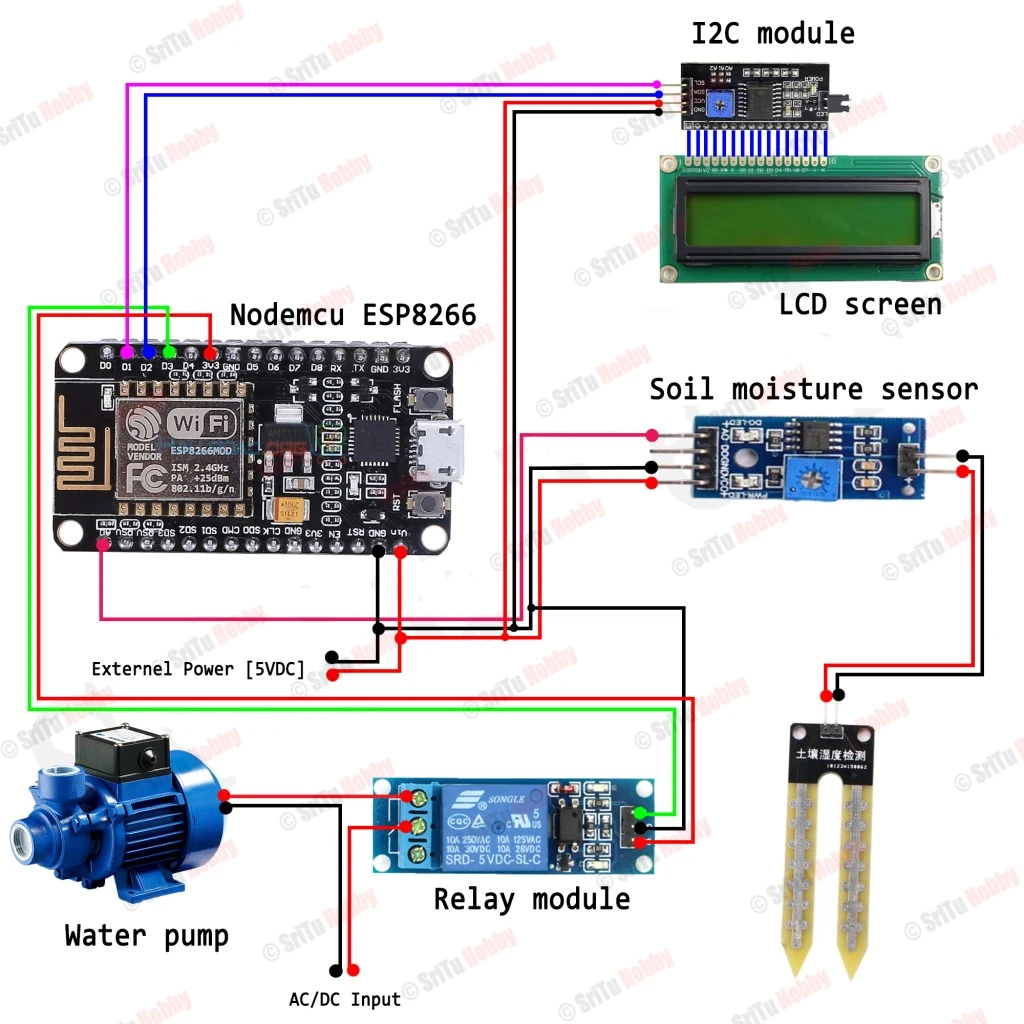
Figure 3: Advanced Setup with LCD Display and Full Components
Enhancement Ideas
- Multiple Plants: Add a servo motor to rotate the water tube between different pots
- Water Level Sensor: Add ultrasonic sensor to monitor reservoir water level
- Data Logging: Store moisture history on SD card or cloud
- Solar Power: Use solar panel and battery for off-grid operation
- Weather Integration: Skip watering if rain is forecasted (using weather APIs)
Safety Precautions
- Always use external power supply for water pump - never power directly from NodeMCU
- Keep electronics away from water - use waterproof enclosures for outdoor use
- Ensure proper wire gauge for pump current to prevent overheating
- Use DC pumps only - never connect AC devices directly to relay without proper isolation
- Supervise initial testing to ensure proper operation and no leaks
Conclusion
Congratulations! You have successfully built your first automated plant watering system using ESP8266. This project not only saves your plants from drying out but also introduces you to the exciting world of IoT and home automation.
With the skills learned in this tutorial, you can expand this system to monitor multiple plants, add smartphone notifications, or even integrate with smart home assistants like Alexa or Google Home.
Happy Gardening and Happy Making!
Recommended Products from FlyRobo
Get all the components you need for this project from our store:
Frequently Asked Questions
Q: Can I power the water pump using NodeMCU USB power?
A: No, USB power (500mA) is insufficient for most water pumps. Always use an external power supply (5V/12V adapter or battery) and control it via the relay module.
Q: How long will the soil moisture sensor last?
A: Capacitive sensors can last several years as they don't corrode like resistive sensors. Avoid leaving resistive sensors powered continuously to prevent electrolysis damage.
Q: Can I use this system for multiple plants?
A: Yes! You can either use multiple sensors and pumps (requires multiplexer or additional pins) or use a single pump with a servo motor to distribute water to different plants.
Q: Is the system safe to leave running unattended?
A: After thorough testing, yes. However, we recommend adding a water level sensor to prevent pump dry-running and checking the system periodically for the first few weeks.

Leave a Comment