
The Ultimate Guide to Getting Started with Arduino
What is Arduino?
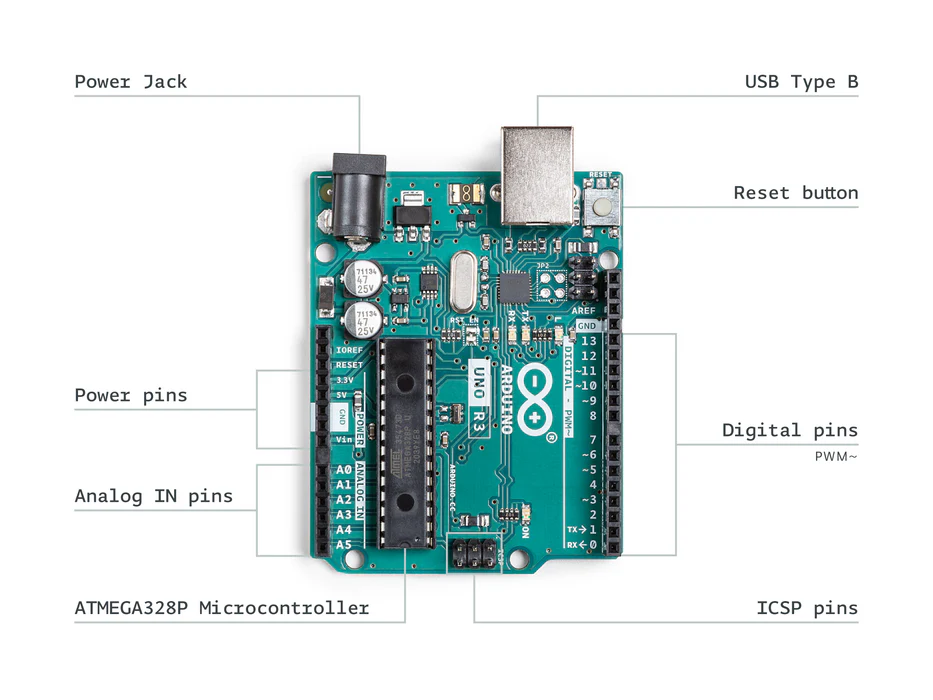
Arduino is an open-source electronics platform that combines easy-to-use hardware (microcontroller boards) with intuitive software (Arduino IDE). Born in 2005 at the Ivrea Interaction Design Institute in Italy, Arduino was designed to make electronics accessible to everyone—not just engineers and programmers.
At its core, an Arduino board is a small computer (microcontroller) that can take inputs from the physical world—like light sensors, button presses, or temperature readings—and convert them into outputs—such as activating motors, turning on LEDs, or sending data to the internet. Think of it as the brain of your electronic projects.
Why Arduino Dominates the Maker World
- Beginner-Friendly: No prior programming or electronics experience required
- Affordable: Boards start from just ₹1,500, making it accessible to everyone
- Cross-Platform: Works on Windows, macOS, and Linux
- Massive Community: Millions of users, countless tutorials, and extensive libraries
- Versatile: From simple LED blinking to complex robotics and IoT applications
- Open Source: Hardware designs and software are freely available
Understanding Arduino Boards: R3 vs R4 (2025 Edition)
As of 2025, Arduino offers several board options, but the most popular for beginners are the UNO R3 and the newer UNO R4 series. Understanding the differences will help you make the right choice for your projects.

Detailed Comparison: UNO R3 vs UNO R4
| Feature | Arduino UNO R3 | Arduino UNO R4 Minima | Arduino UNO R4 WiFi |
|---|---|---|---|
| Microcontroller | ATmega328P (8-bit) | Renesas RA4M1 (32-bit ARM Cortex-M4) | Renesas RA4M1 (32-bit ARM Cortex-M4) |
| Clock Speed | 16 MHz | 48 MHz (3x faster) | 48 MHz (3x faster) |
| Memory | 32KB Flash, 2KB SRAM | 256KB Flash, 32KB SRAM | 256KB Flash, 32KB SRAM |
| WiFi/Bluetooth | No | No | Yes (ESP32-S3) |
| USB Connector | USB-B | USB-C | USB-C |
| Operating Voltage | 5V | 5V | 5V |
| Input Voltage | 7-12V | 6-24V (wider range) | 6-24V (wider range) |
| Digital I/O Pins | 14 (6 PWM) | 14 (6 PWM) | 14 (6 PWM) |
| Analog Inputs | 6 (10-bit) | 6 (14-bit ADC) | 6 (14-bit ADC) |
| DAC Output | No | Yes (12-bit on A0) | Yes (12-bit on A0) |
| Real-Time Clock | No | Yes | Yes |
| LED Matrix | No | No | 12x8 Red LEDs |
| Price Range | ₹1,500 - ₹2,500 | ₹2,200 - ₹3,200 | ₹3,500 - ₹4,500 |
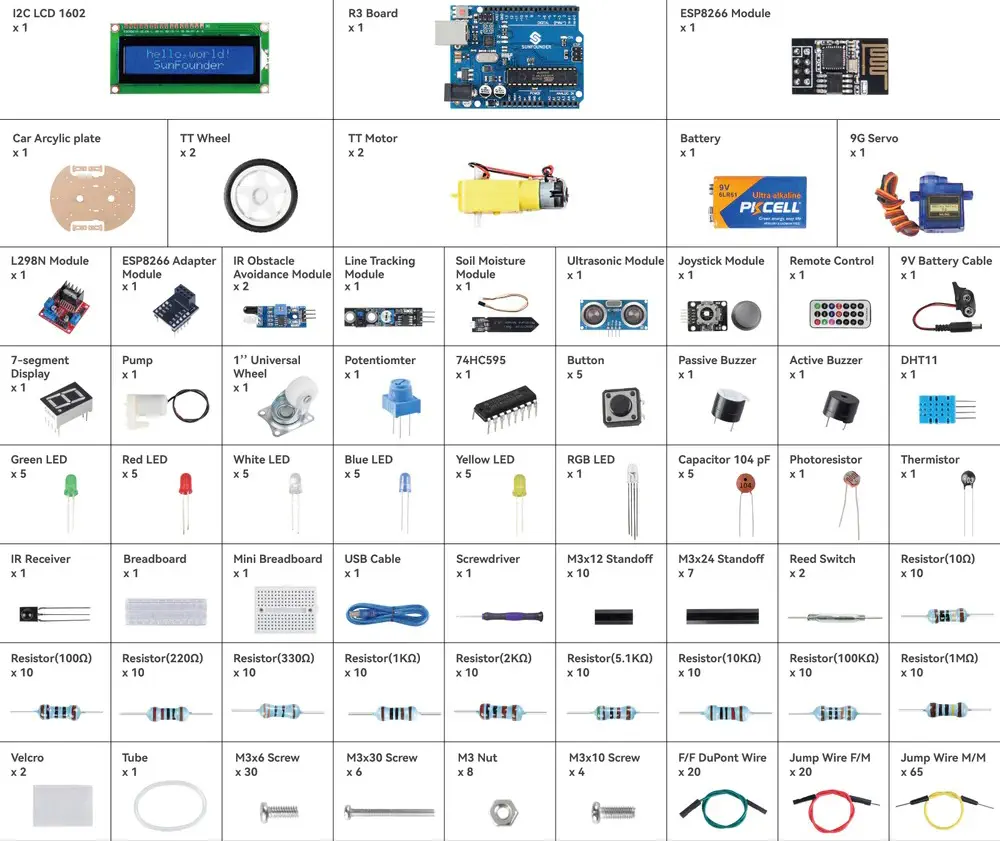
Essential Components in an Arduino Starter Kit
Before you begin programming, you'll need the right hardware. A typical Arduino Starter Kit includes everything you need to complete dozens of projects. Here's what to look for:
The brain of your projects. UNO R3 or R4 recommended for beginners.
For programming and powering the board from your computer.
Solderless prototyping board for temporary circuit connections.
Light Emitting Diodes in various colors for visual feedback.
220Ω, 1kΩ, 10kΩ values to limit current and protect components.
For user input and interaction with your projects.
Temperature, humidity, ultrasonic distance, and light sensors.
Precise position-controlled motors for mechanical movement.
16x2 character display for showing data and messages.
Male-to-male, male-to-female, and female-to-female connections.
Setting Up Your Arduino Development Environment
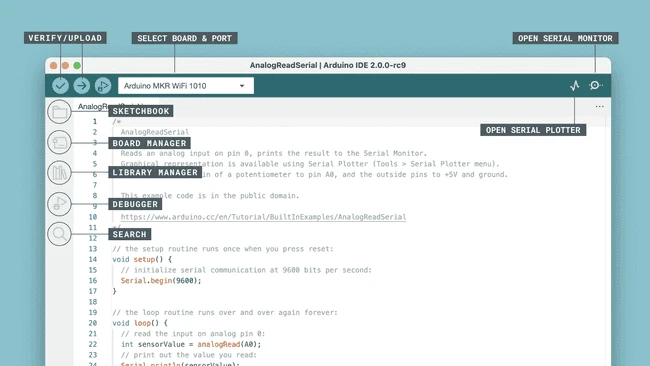
Step 1: Download and Install Arduino IDE
The Arduino IDE (Integrated Development Environment) is where you'll write, compile, and upload code to your board. As of 2025, Arduino IDE 2.x is the recommended version, offering modern features like code autocomplete, syntax highlighting, and integrated debugging.
Installation Steps:
- Visit arduino.cc/en/software
- Download IDE 2.x for your operating system (Windows, macOS, or Linux)
- Run the installer and follow the setup wizard
- Connect your Arduino board using the USB cable
- Open IDE → Tools → Board → Select your board model (Arduino UNO)
- Tools → Port → Select the COM port (Windows) or /dev/tty.usbmodem (Mac)
Understanding Arduino Programming Basics
Arduino uses a simplified version of C/C++ programming language. Every Arduino sketch (program) has two essential functions:
void setup() {
// Initialize pins, serial communication, libraries here
}
// Loop runs repeatedly forever
void loop() {
// Main program logic goes here
}
Key Programming Concepts
- pinMode(pin, mode): Configures a digital pin as INPUT or OUTPUT
- digitalWrite(pin, value): Sets a digital pin HIGH (5V) or LOW (0V)
- digitalRead(pin): Reads the state of a digital input (HIGH or LOW)
- analogRead(pin): Reads analog voltage (0-1023 on UNO R3, 0-16383 on R4)
- analogWrite(pin, value): Outputs PWM signal (0-255) for motor/LED control
- delay(ms): Pauses program execution for specified milliseconds
- Serial.begin(baudrate): Starts serial communication for debugging
Your First Project: Blinking LED (The "Hello World" of Arduino)
Let's start with the classic first project—making an LED blink. This simple exercise teaches you the fundamentals of circuit building and coding.
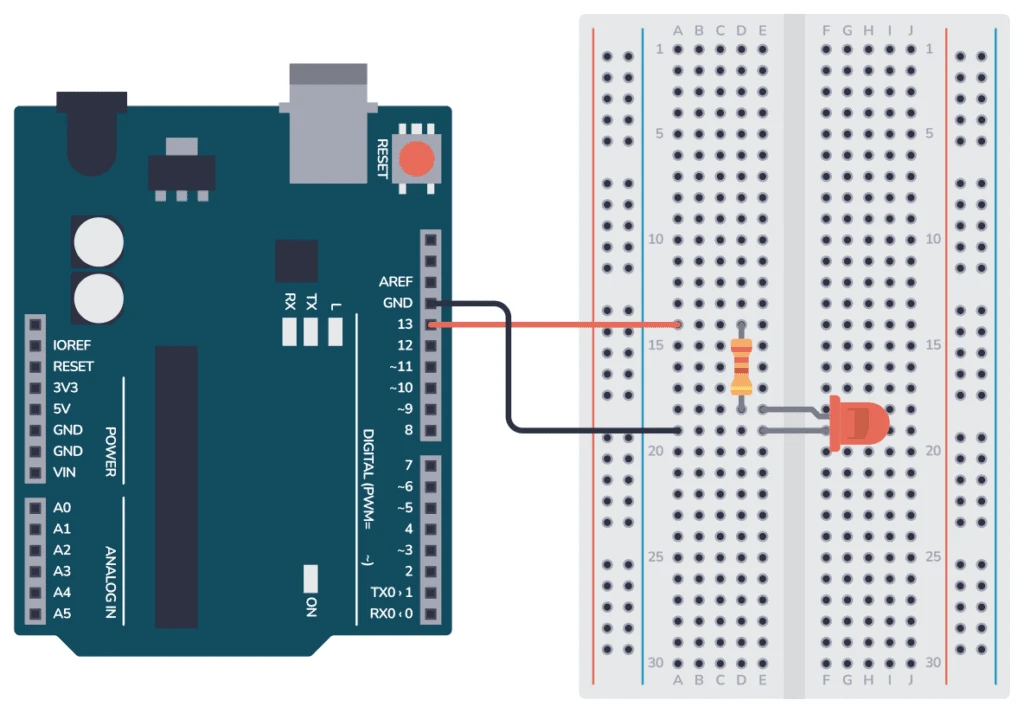
Hardware Connections
- Connect the long leg (anode) of the LED to Pin 13 on Arduino
- Connect the short leg (cathode) to one end of the 220Ω resistor
- Connect the other end of the resistor to GND (Ground)
- Alternatively, use the built-in LED on pin 13 (no external components needed for testing)
The Code
// Define LED pin - most Arduinos have an onboard LED on pin 13
const int ledPin = 13;// The setup function runs once when you press reset or power the board
void setup() {// Initialize digital pin LED_BUILTIN as an output
pinMode(ledPin, OUTPUT); } // The loop function runs over and over again forever
void loop() { digitalWrite(ledPin, HIGH); // Turn the LED on (HIGH is the voltage level)
delay(1000); // Wait for a second (1000 milliseconds)
digitalWrite(ledPin, LOW); // Turn the LED off by making the voltage LOW
delay(1000); // Wait for a second
}
How to Upload Code
- Connect your Arduino to the computer via USB
- Open Arduino IDE and paste the code above
- Click Verify (checkmark icon) to compile the code
- Click Upload (arrow icon) to send the code to your board
- Watch the TX/RX LEDs blink during upload, then your LED should start blinking!
Level Up: Working with Sensors and Motors
Once you've mastered the basics, it's time to interact with the physical world. Sensors allow your Arduino to "see" and "feel," while motors let it "act."
Popular Sensors for Beginners
| Sensor | Function | Application Examples |
|---|---|---|
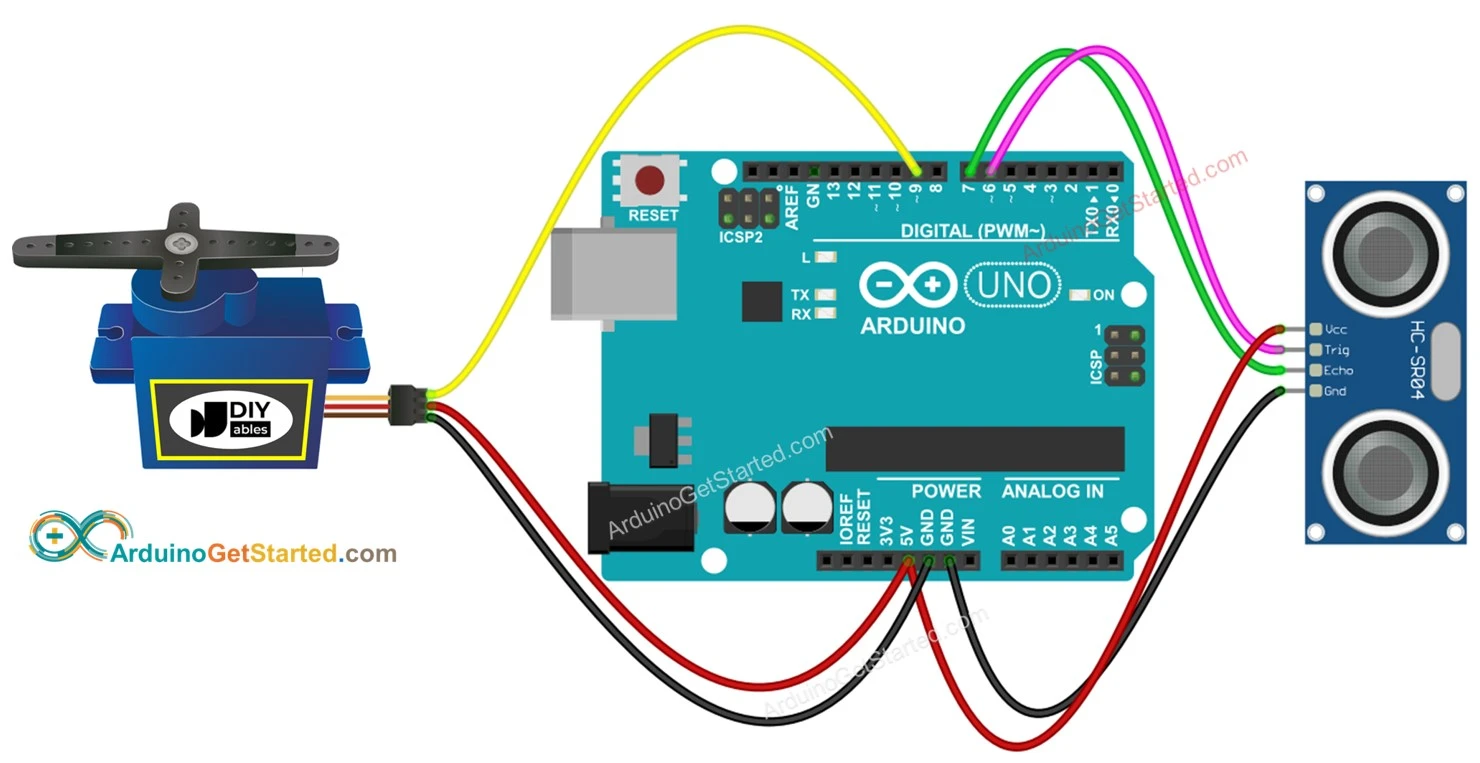
| HC-SR04 Ultrasonic | Measures distance (2cm to 400cm) | Obstacle avoidance robots, parking sensors |
| DHT11/DHT22 | Temperature and humidity | Weather stations, greenhouse monitoring |
| PIR Motion | Detects movement/infrared changes | Security systems, automatic lighting |
| LDR (Photoresistor) | Detects light intensity | Automatic street lights, camera exposure |
| MQ-2 Gas Sensor | Detects smoke, LPG, CO, alcohol | Gas leak detectors, air quality monitors |
Example: Reading Temperature and Humidity with DHT11
#include "DHT.h" // Define DHT pin and type
#define DHTPIN 2
#define DHTTYPE
DHT11 DHT dht(DHTPIN, DHTTYPE);
void setup() {
Serial.begin(9600);
Serial.println("DHT11 Sensor Test"); dht.begin();
}
void loop() { // Wait a few seconds between measurements
delay(2000); // Read humidity (%)
float humidity = dht.readHumidity(); // Read temperature as Celsius
float temperature = dht.readTemperature(); // Check if any reads failed
if (isnan(humidity) || isnan(temperature)) {
Serial.println("Failed to read from DHT sensor!"); return;
} // Print results to Serial Monitor
Serial.print("Humidity: ");
Serial.print(humidity);
Serial.print("% Temperature: ");
Serial.print(temperature);
Serial.println("°C");
}
5 Exciting Beginner Projects to Try in 2025
Ready to apply your skills? Here are five projects that combine multiple concepts and will impress your friends:
? Obstacle Avoiding Robot
Build a robot car using an ultrasonic sensor to detect and avoid obstacles. Learn motor control, sensor integration, and basic robotics.
Components: Robot chassis, 2 DC motors, L298N driver, HC-SR04 sensor? Smart Home Automation
Control lights and fans using a relay module and PIR sensors. Add Bluetooth module to control via smartphone.
Components: Relay module, PIR sensor, Bluetooth HC-05, jumper wires? Automated Plant Watering
Monitor soil moisture and automatically water plants when dry. Perfect for gardening enthusiasts.
Components: Soil moisture sensor, water pump, relay module, tubing? Weather Station
Display real-time temperature, humidity, and pressure on an LCD. Log data to SD card for analysis.
Components: DHT22, BMP180 pressure sensor, 16x2 LCD, SD card module? Gesture Controlled Robot
Use an accelerometer to control a robot's movement by tilting your hand. Advanced but achievable!
Components: MPU6050 accelerometer, NRF24L01 wireless module, robot chassis? RFID Door Lock
Create a secure access system using RFID tags. Learn about security, EEPROM storage, and servo control.
Components: RC522 RFID module, servo motor, LED indicators, buzzerTroubleshooting Common Beginner Issues
Even experienced makers encounter problems. Here's how to fix the most common issues:
| Problem | Solution |
|---|---|
| "Port not found" error | Install CH340/CP2102 drivers for clone boards; try different USB cable/port |
| Upload fails with timeout | Double-check board selection; press reset button just before uploading |
| LED not blinking | Check LED polarity (long leg to positive); verify correct pin number in code |
| Erratic sensor readings | Add pull-up resistors; check wiring connections; ensure adequate power supply |
| Board not powering on | Check USB cable (some are charge-only); verify no shorts on breadboard |
Advanced Topics: What's Next After the Basics?
Once you're comfortable with the fundamentals, consider exploring these advanced areas:
- Internet of Things (IoT): Connect your Arduino to the cloud using ESP8266/ESP32 or the UNO R4 WiFi's built-in connectivity
- PCB Design: Learn to design custom circuit boards using EasyEDA or KiCad
- 3D Integration: Design enclosures and mechanical parts using Fusion 360 or Tinkercad
- Machine Learning: Implement edge AI with TinyML on compatible boards
- Real-Time Operating Systems (RTOS): Learn FreeRTOS for complex multi-tasking projects
Resources for Continuous Learning
The Arduino journey never truly ends. Here are the best resources to keep growing:
- Official Arduino Project Hub: hub.arduino.cc - Thousands of community projects with step-by-step guides
- Arduino Reference: arduino.cc/reference - Complete documentation of functions and libraries
- FlyRobo Tutorials: Check our blog for India-specific projects and component sourcing guides
- YouTube Channels: Paul McWhorter, DroneBot Workshop, and Programming Electronics Academy
- Forums: Arduino.cc forum and Reddit's r/arduino for community help
Ready to Start Your Arduino Journey?
Get everything you need with our premium Arduino Starter Kits, featuring genuine boards, high-quality components, and exclusive project guides tailored for Indian makers.
✓ Free Shipping | ✓ Technical Support
Shop Arduino Kits NowConclusion
Arduino opens the door to endless creativity in electronics and programming. Whether you want to build a simple automated light or a complex robotic system, the skills you've learned in this guide provide the foundation for all your future projects.
Remember, every expert was once a beginner. Don't be discouraged by initial failures—they're just learning opportunities. The Arduino community is incredibly supportive, and with the resources available today, there's never been a better time to start.
Start small, think big, and keep building!

Leave a Comment