31 Mar

(Credit : Indian LifeHacker)
Hello,
In this tutorial,we are going to learn how to make smart home using Nodemcu (ESP8266), which is able to control electronic Device (like fan, light etc.) through internet.
Hardware Required :
-
NodeMCU (ESP8266)
- Relay (Any One)
- Jumper Wires (As per need)
- 20cm Female To Female Jumper Cable Wire For Arduino
- 20cm Male To Female Jumper Cable Wire For Arduino
- 20cm Male To Male Jumper Cable Wire For Arduino
Software Required :
Step : 1
- Download the Blynk app on your smartphone and create an account
- Create a new project, select "NodeMCU" from the list of hardware.
- Add a widget to your control panel by clicking on the plus icon on the top
- Email Auth Token for record, it will needed later in 4th Step.
- Select the Button widget,and double tap on it to edit its settings.
Step : 2
Join the wires in Nodemcu using diagram
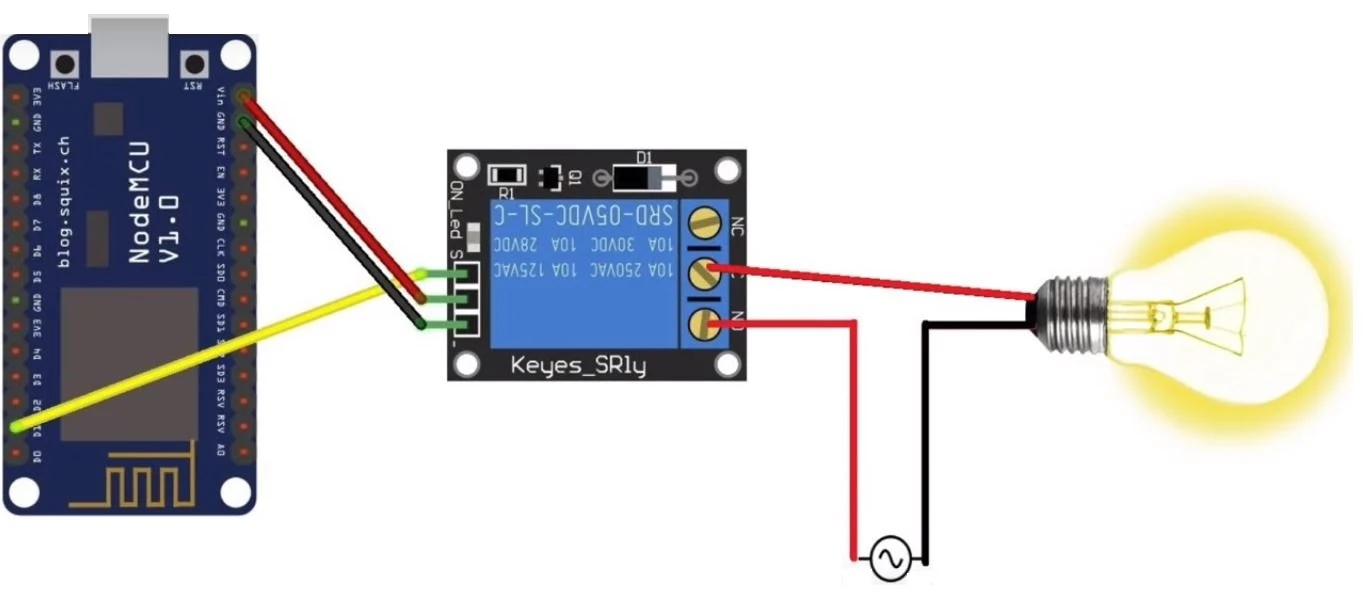
Note: This Diagram is only for 1 channel, You can use more channel as per your requirement.
- The 5v of the power to the Vcc of the relay board.
- The GND to the GND of the relay board
- The D1 of the NodeMCU to the IN of the relay board
Step : 3
Arduino IDE Configuration (Adding ESP8266 Board Manager)
- Go to (File → Preferences) In 'Additional Boards Manager' paste this link http://arduino.esp8266.com/stable/package_esp8266com_index.json
- Go to "Tools → Board → Boards Manager", type "ESP8266" and install it.
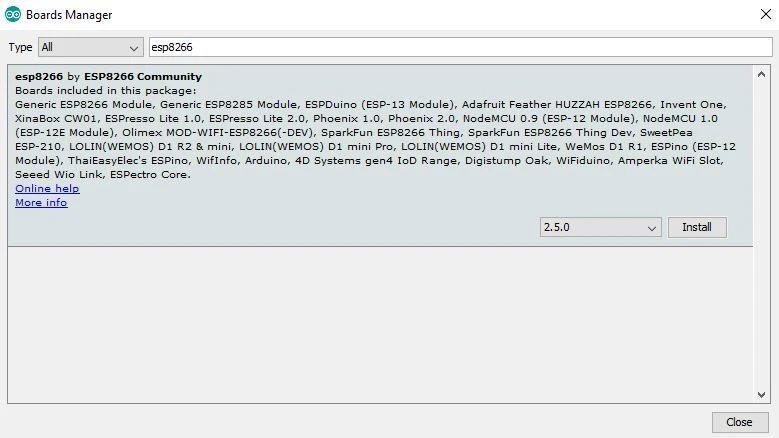
- Go again to "Tools → Board" and select "Generic ESP8266 Module".
- Find Arduino Code and library from here https://goo.gl/sizPGA
- Copy Library in "Documents→Arduino→libraries" and unzip it.
- Open Code
- Replace Wifi SSID and Password in coding with yours.
- Replace Auth Token which we have mailed in 1st step
- Upload Code to NodeMcu ESP8266
Now Your Device is Ready To Use.

-50 %
The ESP8266 NodeMCU CH340 board has ESP8266 which is a highly integrated chip designed for the needs of a new connected world. It offers a complete an..
₹193 ₹389

--17 %
ESP-01 8266 is a WiFi module, which means it can connect to a WiFi network to send and receive data. It is also a basic part of IoT, which is lower in..
₹128 ₹109

-30 %
This is a 2-Channel Relay interface board. It can be used to control various appliances and other types of equipment with a large current. It can be c..
₹73 ₹104

-18 %
This is a 4-Channel Relay interface board. It can be used to control various appliances and other types of equipment with a large current. It can be c..
₹146 ₹178

4 Comment(s)
This < http://arduino.esp8266.com/versions/2.4.0/package_esp8266com_index.json> link is broken. Please provide working link.
Thanks
Hi Rahul, Thank You for inform us.
Kindly Find out updated URL
http://arduino.esp8266.com/stable/package_esp8266com_index.json
Please send me the diagram for 4 channel
Send me also diagram and codes for 4 channel relay module
The given code is already made for up to 4 channel repay.
Leave a Comment