25 Dec

Hello,
In this tutorial-based article, we are going to learn how to make a staircase climbing robot using Arduino.
The concept of a staircase climbing robot is pretty rudimentary but the mechanism behind it is very useful. The mechanism used in this robot is called a rocker-bogie mechanism.
Hardware Required
Software Required
Rocker-bogie mechanism
- The rocker-bogie mechanism is a suspension system that is very simple and elegant. It was developed by NASA in the year 1988 which was first used in the mars rover Sojourner. Since then this has been the go-to suspension system for rovers. This suspension system has been used in 2003 mars mission robots Spirit and Opportunity. It has also been used in the 2012 mars rover Curiosity and the 2020 mars rover Perseverance.
- This suspension system has no springs or axles. This allows the rover to climb obstacles that are twice in diameter to its wheels. The stability of any system depends on its center of mass. The lower the center of mass, the more stable the system will be.
- The 'rocker' part is the larger link and is usually in the front of the suspension system. This is the link that rocks when comes into contact with an obstacle. The 'bogie' part is the smaller link and usually handles more load than the rocker part.
- This system is designed to be used at low speeds to minimize shocks and increase the ability of the system to climb various obstacles.
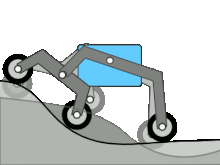
- The above animation shows how a rocker-bogie mechanism works. As you can see the center of the chassis is completely stable even through the ups and downs of the road.
- When an obstacle is in front of the system, the center and rear wheels push the front wheel up to the obstacle and then push it against the obstacle. This lifts the front wheels which climb the obstacle. Now, the center wheel is touching the obstacle. This wheel is pushed by the rear wheels against the obstacle and pulled by the front wheel which is up and over the obstacle. This is how the center wheel climbs the obstacle.
- Now the rear wheel is pushed against the obstacle, this wheel is now pulled by both center and front wheels.
- This is how each wheel climbs over an obstacle.
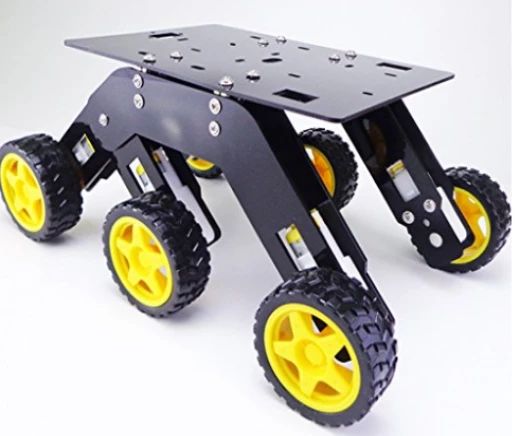
- The chassis for this project can be made from different sources. Some of the project makers have used PVC pipes, some have used cardboard to make the chassis. We used an acrylic sheet cut-out to make the chassis for the car. It looks something like this.
Circuit Diagram
- The circuit diagram of this project is pretty simple: There are only four different components. Arduino board, Arduino shield, Motors, and the Bluetooth module.
- The Arduino shield sits on top of the Arduino board.
- There are a total of six motors, three on each side. The motors on each side are connected in parallel. This means that all the motors on one side will move simultaneously.
- Finally, the Bluetooth module is connected to the Arduino shield. The VCC pin on HC-05 is connected to the 5V on Shield. The GND pin is connected to the GND pin on Shield. Tx and Rx pins are connected to Rx and Tx pins on the shield respectively.
Arduino Code
- Upload the code to the Arduino board. Perform the circuit diagram
- Download and install the Arduino RC Bluetooth car app from the Playstore here.
- Pair the Bluetooth via your smartphone. Once the Bluetooth is connected, you can operate the car from your smartphone.
Now your staircase climbing robot is ready for use.

Hot
-56 %
The Arduino Uno R3 Compatible board is an electronic hardware device used to build and program electronic circuits and projects. The board is based on..
₹574 ₹1,299

-37 %
L293D use 16 pin DIP package, its internal integration is bipolar H - bridge circuit.
This kind of bipolar pulse width method has many advantages, su..
₹112 ₹179

-40 %
HC-05 is a Bluetooth Transceiver Module and has TTL Output. HC-05 6 Pin Wireless Serial Bluetooth Module is a Bluetooth module for use with any microc..
₹299 ₹499

-20 %
Plastic Tire Wheel With DC 3-6v Gear Motor For Arduino Smart Car
Specifications:
Motor:
Voltage: DC 3V-6V
Current: 100 MA-120MA
Reduct..
₹79 ₹99

This is 10pcs of each (10 M-M, 10 M-F, 10 F-F) jumper cable Dupont wire for Arduino.
Specifications:
This is 10 pcs of each (total 30 pcs) ..
₹114

-4 %
Out Of Stock
This is general 9v Battery for all your project and application needs. Whether you need a new battery for your applications like a Flashlight, Portabl..
₹24 ₹25

Leave a Comment