
Hello,
In this tutorial-based article, we are going to learn how to make a smoke detection system using Arduino.
Hardware Required
-
Arduino Uno
-
MQ-2 Gas Sensor
-
Green LED 5mm
-
Red LED 5mm
-
220-ohm resistor
-
Buzzer
-
Jumper cables
-
Breadboard
Software Required
MQ-2 Sensor
-
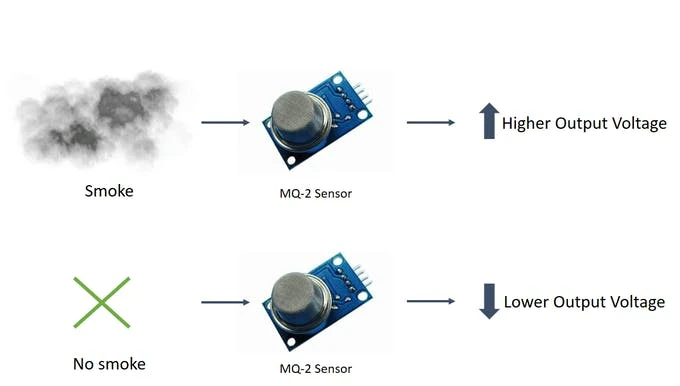
MQ-2 sensor is a smoke and flammable gas sensor which can detect LPG, methane, propane, butane, alcohol, and hydrogen. The sensor has a built-in sensing material that changes its resistance depending upon the type of gas it detects. This type of sensor is also called chemiresistors.
-
This sensor also has a potentiometer on its back which can be adjusted according to the sensitivity required.

-
The relationship between the output voltage and the intensity of smoke is as follows:
-
As the intensity of the smoke increases, the output voltage also increases.
-
As the intensity of the smoke decreases, the output voltage also decreases.
Circuit Diagram
-
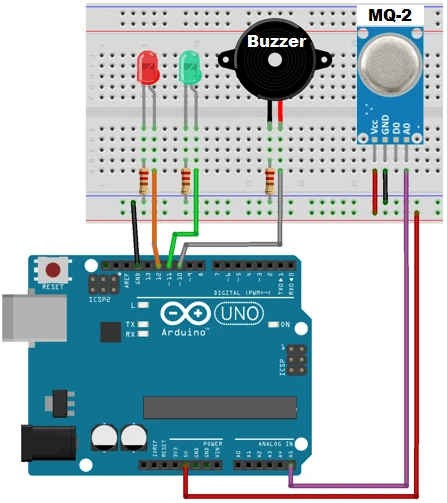
The circuit diagram for the smoke detection system is as follows:
|
Pins on MQ-2 |
Pins on Arduino Uno |
|
A0 |
A5 |
|
VCC |
5V |
|
GND |
GND |
-
Connect the negative terminals of the LEDs and buzzer to the ground pin on the breadboard via a 220-ohm resistor.
-
Connect the positive terminal of the buzzer to pin 10.
-
Connecting the positive terminals of green and red led to pins 11 and 12 respectively.
The working concept of the Smoke detection system
-
As soon as the system is powered, the sensor starts giving output according to the smoke present. It gives the output in the form of a number.
-
We set the threshold for a smoke at 400. So as soon as the sensor gives output higher than 400, the system triggers the condition that smoke is detected.
-
Now in this condition, the Arduino board sends the signal to the buzzer to make noise and it will send the signal to light up the red led.
-
As soon as the smoke value falls below the threshold, the condition will be lifted and the Arduino board will send the signal to light up the green led and the buzzer will stop.
Arduino code
-
The Arduino code for this project is mentioned below:
int redLed = 12; int greenLed = 11; int buzzer = 10; int smokeA0 = A5;int sensorThres = 400; void setup() { pinMode(redLed, OUTPUT); pinMode(greenLed, OUTPUT); pinMode(buzzer, OUTPUT); pinMode(smokeA0, INPUT); Serial.begin(9600); } void loop() { int analogSensor = analogRead(smokeA0); Serial.print("Pin A0: "); Serial.println(analogSensor); // Checks if it has reached the threshold value if (analogSensor > sensorThres) { digitalWrite(redLed, HIGH); digitalWrite(greenLed, LOW); tone(buzzer, 1000, 200); } else { digitalWrite(redLed, LOW); digitalWrite(greenLed, HIGH); noTone(buzzer); } delay(100); } |
- Upload the code. After uploading the code, as soon as you power up the machine, the smoke sensor will start detecting the smoke.
Your smoke detection system is ready for use!


")
")


Leave a Comment