13 Aug

Hello,
In this tutorial, we are going to learn how an MQ-2 Smoke sensor works and also interface with Arduino.
Hardware Required
Software Required
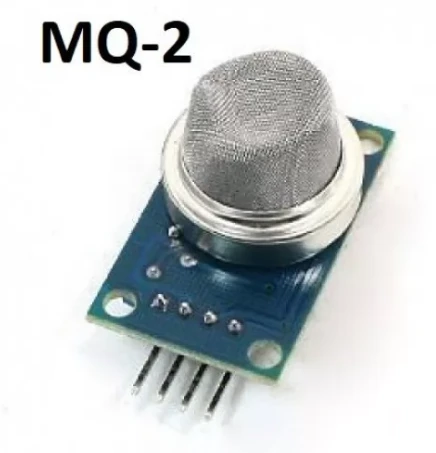
MQ2 Smoke sensor
- Nowadays, electrical systems are used in every part of our lives. Almost everything we use in our day-to-day lives is made of electronic components. And electrical systems are largely comprised of sensors and actuators. There are a lot of different sensors and they detect different things like fire, temperature, smoke, air, humidity, motion etc.
- MQ2 sensor is a gas sensor that is used to detect gas leakages in homes as well as in industries. This sensor operates on 5V.
- One such sensor which is mostly used in home safety systems is the MQ2 smoke sensor.
- This sensor is used in small robotics projects as it provides great performance and is very economical. The MQ2 can detect a variety of things like methane, butane, smoke, propane, Alcohol, carbon monoxide. This makes it a wonderful choice for detecting many different kinds of things.
Construction & Working principle

- The MQ2 sensor comprises a sensing element that is mainly made up of aluminum-oxide-based ceramic. This material is coated with Tin dioxide and then this assembly is enclosed with a steel mesh.
- The sensing element has six terminals attached to it. Two terminals are responsible for heating up the sensing element, the other four are used for output signals.
- Let us consider the example of oxygen gas. When the sensor is heated, it absorbs the gases in the atmosphere around it.
- Tin oxide has donor electrons present in it, which are attracted towards oxygen. So we can detect the amount of oxygen present in it by identifying the donor electrons.
- The output signals generate the appropriate voltage values which are generated from the amount of the gas which is to be detected.
Pinout of MQ2 Sensor
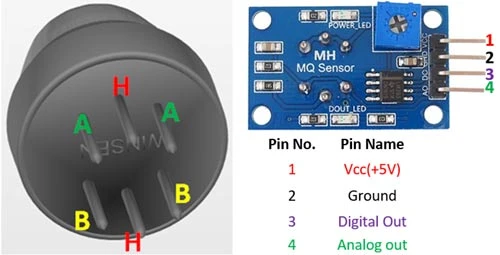
- The above image shows the six terminals of the MQ2 sensor.
- The MQ2 sensor board has 4 pins
- VCC is the power supply pin.
- GND is the ground pin.
- DO is the digital output pin.
- AO is the analog output pin.
Interfacing with Arduino
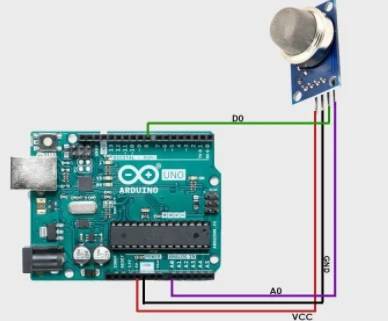
- Connect the VCC pin to the 5V pin of the Arduino board.
- Connect the GND pin to the GND pin of the Arduino board.
- Connect the digital output pin to digital pin 8 of the Arduino board.
- Connect the analog output pin to analog pin 0 of the Arduino board.
Arduino Code
#define MQ2pin (0)

float sensorValue;

void setup()
{
  Serial.begin(9600);
  Serial.println("Gas sensor warming up!");
  delay(20000);
}

void loop()
{
  sensorValue = analogRead(MQ2pin);

  Serial.print("Sensor Value: ");
  Serial.print(sensorValue);

  if(sensorValue > 200)
  {
    Serial.print(" | Smoke detected!");
  }

  Serial.println("");
  delay(2000);
}
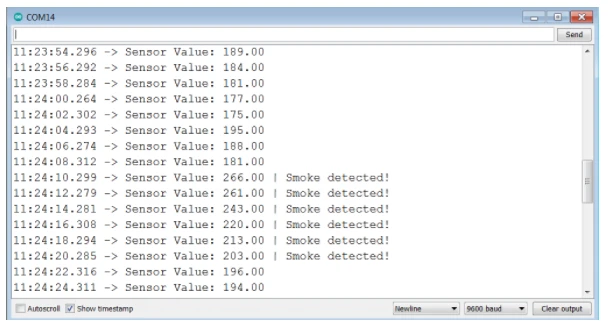
- Upload the code to the Arduino board. Open the Serial monitor.
- It will show something like this. Whenever smoke is detected, you will get the message that smoke detected.
- I hope you learned something about the MQ2 smoke sensor from this article and I hope that you liked it. Thank you.

Hot
-56 %
The Arduino Uno R3 Compatible board is an electronic hardware device used to build and program electronic circuits and projects. The board is based on..
₹574 ₹1,299

This is 10pcs of each (10 M-M, 10 M-F, 10 F-F) jumper cable Dupont wire for Arduino.
Specifications:
This is 10 pcs of each (total 30 pcs) ..
₹114

-45 %
The analog gas sensor - MQ2 is used in gas leakage (like Smoke methane and liquified flammable gas) detecting equipment in consumer and industry marke..
₹77 ₹140

Leave a Comment