20 Dec

Hello,
In this tutorial, we are going to make a motion sensor using Arduino.
Hardware Required
Software Required
PIR Sensor
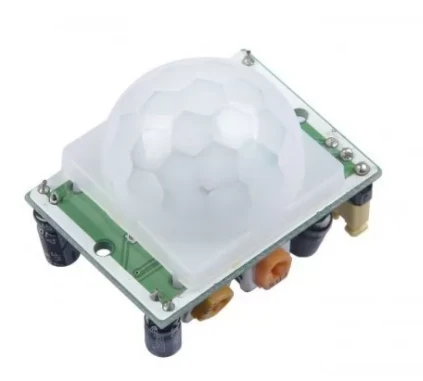
- The passive infrared sensor is an electronic component that absorbs and measures the infrared radiation emitted by any objects in its vicinity. The term "Passive" is used because this sensor does not emit any infrared light. It just absorbs the radiation emitted by other objects. This infrared radiation is not visible to the human eye as infrared is outside the visible spectrum of the human eye. Every object with a temperature above absolute zero emits infrared radiation. These radiations are measured and converted into electrical signals by the PIR sensor.
- The working of the PIR sensor might seem simple on the surface. But the inside working of the sensor is quite complex.
- This sensor contains two slots. Both slots contain infrared sensing material.
- In equilibrium conditions, both the slots will detect the same amount of radiation. But when an object enters the vicinity of the sensor, the first slot will detect it but the second slot will not. This will create a positive difference between the two slots.
- Similarly, when an object exits the vicinity of the sensor, the second slot will detect it and the first slot will not. This will create a negative difference between the two slots.
- This difference is used to track the motion of an object. The sensor converts all this data into electrical signals.
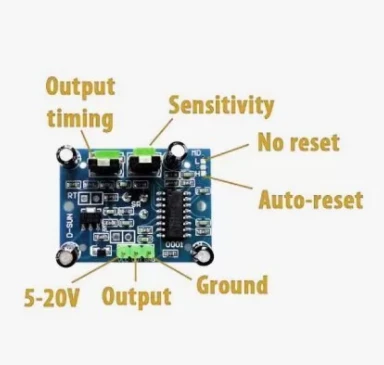
- The PIR sensor has three pins: VCC, Signal output pin, and GND.
- Further, it has two potentiometers that help in adjusting the output timing and the sensitivity of the sensor.
Circuit Diagram
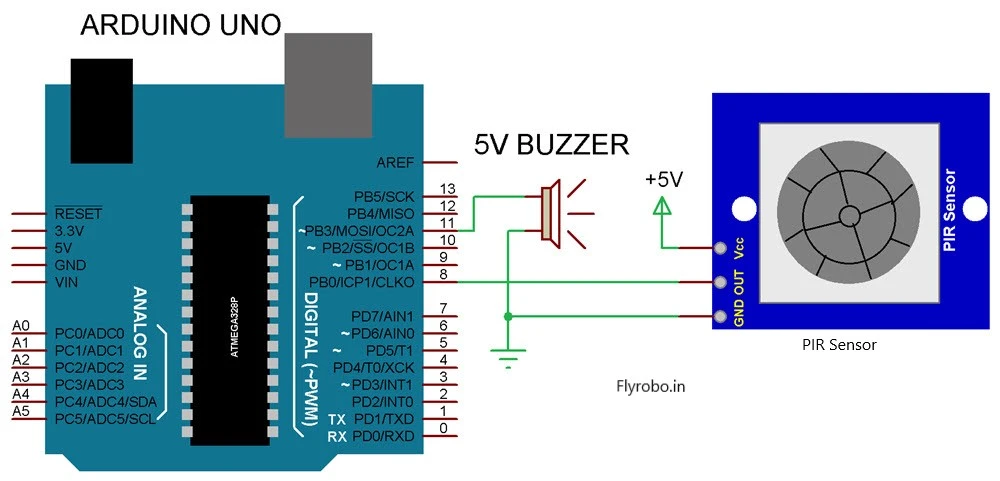
- Here, the signal pin of the PIR sensor is connected to the Digital pin 8 of the Arduino board. The VCC is connected to a 5V pin and GND to GND.
- The Buzzer is connected to pin 11 of the Arduino board and GND is connected to GND.
Working Concept
- The working concept of this project is quite simple. The PIR sensor will continuously collect data from the surroundings.
- As soon as any object enters the vicinity of the sensor. It will immediately send out electrical signals to the Arduino board indicating that there is motion in front of the sensor.
- Arduino board on receiving the signal from the sensor, then commands the piezoelectric buzzer to make noise.
- The buzzer will start ringing completing the cycle.
Arduino Code
int buzzer = 11;
int sensor = 8;
int led = 13;
void setup()
{
  pinMode(buzzer, OUTPUT);
  pinMode(sensor, INPUT);
  pinMode(led, OUTPUT);

  digitalWrite(buzzer,LOW);
  digitalWrite(sensor,LOW);

  digitalWrite(led,LOW);

  while(millis()<13000)
  {
    digitalWrite(led,HIGH);
    delay(50);
    digitalWrite(led,LOW);
    delay(50);
  }
  digitalWrite(led,HIGH);

}

void loop()
{
  if(digitalRead(sensor)==HIGH)
  {
   digitalWrite(buzzer,HIGH);
   delay(3000);
   digitalWrite(buzzer,LOW);
   while(digitalRead(sensor)==HIGH);
  }
}
- Upload the code to the Arduino board.
- This project has many applications in the home security industry, factories where you have to track the motion of robots, tracking shipments within a warehouse, and many more.
Now your Motion Sensor is ready to use.

Hot
-59 %
The Arduino Uno R3 Compatible board is an electronic hardware device used to build and program electronic circuits and projects. The board is based on..
₹528 ₹1,299

This is 40pcs of each (40 M-M, 40 M-F, 40 F-F) jumper cable Dupont wire for Arduino.
Specifications:
This is 40 pcs of each (total 120 pcs)..
₹159

-28 %
The HC-SR501 PIR Motion Detector Sensor Module is a pyroelectric device that detects motion by measuring changes in the infrared levels emitted by sur..
₹64 ₹89

-8 %
This is a general-purpose continuous Piezo Electric Buzzer Alarm. It works from 3 to 12 V.
It has two mounting holes and can be easily mounted to ..
₹54 ₹59

Leave a Comment