18 Dec

Hello,
In this project based article, we are going to use various sensors to make a weather station using Arduino Nano.
Hardware Required
Software Required
- In this project, we will capture real-time weather data which is always fascinating. We will capture the data for temperature, humidity, and atmospheric pressure. This data will then be displayed on to an LCD.
DHT11 temperature & Humidity sensor
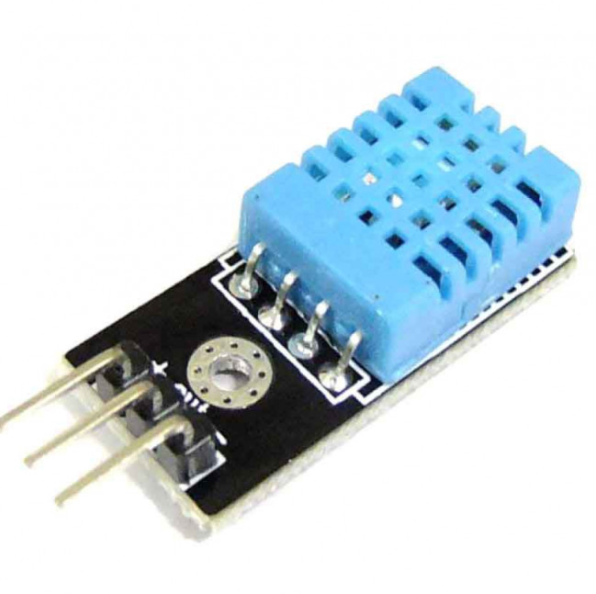
- The DHT11 is a temperature and humidity sensor. This sensor is very common in robotics projects as this gives out great performance and is very economical.
- This sensor consist of three main components. They consist of a humidity sensing component, a thermistor and an integrated chip.
- There is a humidity sensing component which is used to measure the moisture. The humidity sensing component consists of two electrodes with a humidity sensing substrate in between them.
- As the moisture in the air changes, the conductivity of the substrate also changes which in turn changes the resistance of the electrodes between them.
- This change is resistance is read and then the converted in terms of data for humidity by the integrated chip. The data is then sent to the Arduino Uno board.
BMP-280 pressure sensor
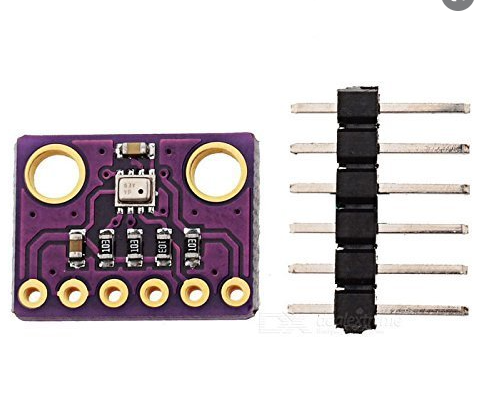
- BMP-280 is a barometric pressure sensor which has been developed by Bosch corporation. It works on a minimum voltage of 1.71V and an consumes a current of 2.7 uA.
- This sensor supports both I2C and SPI communication protocols.
- The sensor BMP-280 has three modes: Sleep mode, forced mode and Normal mode
- In sleep mode, no measurements are taken by the sensor and the consumption of power is minimum.
- In forced mode, a single measurement is taken according to the requirement. Here the power consumed is neither minimum nor maximum.
- In normal mode, there will be cycles of regular measurement and standby period. The speed of the cycle will be decided by the length of standby period.
Circuit Diagram
.jpg)
|
Pins on DHT11 |
Pins on Arduino Nano |
|
Signal Pin D0 |
D2 |
|
VCC |
5V |
|
GND |
GND |
|
Pins on BMP-280 |
Pins on Arduino Nano |
|
VCC |
5V |
|
GND |
GND |
|
SCL |
A5 |
|
SDA |
A4 |
|
Pins on TFT Display |
Pins on Arduino Nano |
|
VCC |
5V |
|
GND |
GND |
|
CS |
D10 |
|
RESET |
D8 |
|
A0 |
D9 |
|
SDA |
D11 |
|
SCL |
D13 |
|
LED |
5V |
Working concept of the weather station
- The weather station comprises of three parts: collecting the real-time weather data, processing the data in the Arduino board, showing the data to the user on the LCD.
- The sensors DHT11 and BMP-280 collect the data in real-time. That data is then converted into electrical signals. These signals are then sent to the Arduino board.
- Arduino board compiles these signals. Then sends the appropriate data in the form of electrical signals to the TFT LCD.
- The LCD then shows the final output to the user.
- All these processes happen in real-time. So the data also gets updated in real time.
- You can 3D print a case to fit all the components as per your needs.
Arduino Code
- Upload the code. Install the necessary libraries. Perform the circuit Diagram.
Now your Arduino weather station is ready to use.

-65 %
The Arduino Nano is a small, complete, and breadboard-friendly board based on the ATmega328 (Arduino Nano 3.x) or ATmega168 (Arduino Nano 2.x). It has..
₹266 ₹756

-51 %
Details and Specifications:
This is 10pcs of each (total 30 pcs) jumper cable Dupont wire for Arduino.
High quality and in good working condit..
₹49 ₹99

-14 %
The 2.4 inch TFT touch Screen LCD Module For Arduino is a large touchscreen display shield with a built-in microSD card connection.
The LCD has ex..
₹571 ₹666

-35 %
BMP280 Barometric Pressure and Altitude Sensor I2C/SPI Module is the cheapest and tiny Atmospheric Sensor Breakout to measure barometric pressure, and..
₹64 ₹99

-49 %
The DHT11 Temperature And Humidity Sensor Module with LED is a small humidity and temperature sensor that you can connect to your Arduino and get read..
₹71 ₹139

Leave a Comment