28 Jan

Hello,
In this tutorial based article, we are going to learn how to build a universal remote using Arduino.
Hardware Required
Software Required
- A remote is something which has become an integral part of our lives. We use it to control our Air conditioners, TVs, lights, fans, Home theaters, DVD Players etc. In this project, we are going to make a Universal remote using Arduino Nano.
- This system sometimes gets too tedious when there are so many remotes in a single household. The concept of universal remote then came into existence to solve this issue.
- This project is actually divided into two parts. Getting the HEX codes for each button and the second part is implementing them in the universal remote.
Decoding the HEX values
- We need to build a small circuit for this purpose. This consists of an Arduino board and an IR receiver.
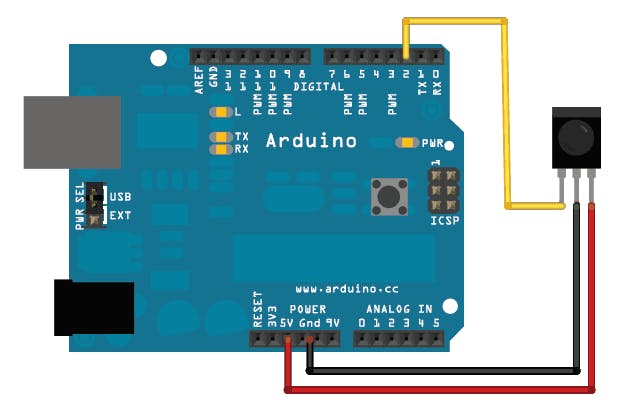
- Power up this circuit. And now start pressing the buttons on your regular remote which you want to incorporate onto your universal remote.
- The decoder prints out the HEX values on the Serial monitor which will be in the form of hexadecimals. This should be converted into decimals before uploading the code onto your universal remote. You can convert them online here.
- The basic buttons like Power, Volume Up, Volume Down, Previous, Next, Source for the TV and Power, Temperature Up, Temperature Down, Swing, Fan, Turbo for the AC. Getting the hex values is very easy.
- Just point the remote in the direction of IR receiver and press the necessary buttons.
#includeint RECV_PIN = 11; IRrecv irrecv(RECV_PIN); decode_results results; void setup() { Serial.begin(9600); irrecv.enableIRIn(); } void loop() { if (irrecv.decode(&results)) { Serial.println(results.value, HEX); irrecv.resume(); } }
- Upload this code to the Arduino board for decoding the HEX values.
Circuit Diagram for Universal Remote
- The circuit diagram for this project comprises of three different parts: The Arduino board, the IR transmitter and the push button.
- The IR transmitter is connected to the Digital Pin 3 on the Arduino board.
- The pushbuttons are connected to digital pins 4,5,6,7.
- The power supply is connected to VCC and GND.
.PNG)
Working Concept
- The working concept is divided into two parts as the project is divided into two parts: first part contains decoding the hex values for different buttons and the second part contains implementing those values in our universal remote.
- The circuit diagram for the decoding is explained above. Perform that diagram. Now point the regular remote towards it and start pressing the buttons whose function you want on your universal remote.
- Now copy those hex values and convert them to decimal values from the link given above.
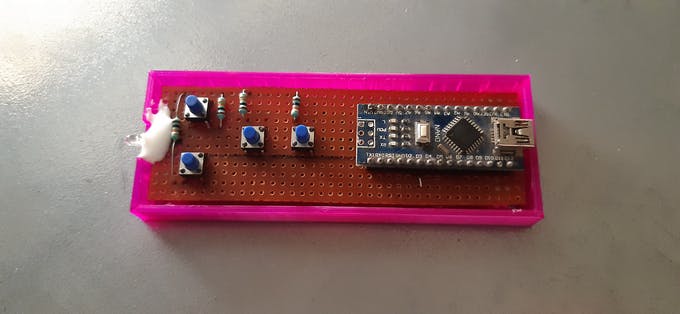
- Perform the circuit diagram for the universal remote.
- As soon as you power up the universal remote now, the function will already be given to the various pushbuttons with the help of Arduino code.
- You can design and 3D print a case for it if you want to. Any kind of case as per your requirement is fine.
Arduino Code
#include#include "LowPower.h" IRsend irsend; const int b1 = 4; const int b2 = 5; const int b3 = 6; const int b4 = 7; int timer; int modeCounter = 0; void wakeUp() { timer = 0; } void setup() { pinMode(LED_BUILTIN, OUTPUT); pinMode(b1, INPUT); pinMode(b2, INPUT); pinMode(b3, INPUT); pinMode(b4, INPUT); } void loop() { attachInterrupt(0, wakeUp, HIGH); while (timer < 10000) { if (digitalRead(b1) == HIGH) { timer = 0; delay(50); irsend.sendNEC(16580863, 32); } if (digitalRead(b2) == HIGH) { timer = 0; delay(50); irsend.sendNEC(16585453, 32); } if (digitalRead(b3) == HIGH) { timer = 0; delay(50); irsend.sendNEC(16618093, 32); } if (digitalRead(b4) == HIGH) { timer = 0; delay(50); irsend.sendNEC(16644103, 32); } delay(1); timer = timer + 1; } LowPower.powerDown(SLEEP_FOREVER, ADC_OFF, BOD_OFF); }
- First replace the decimal places with your decimals inside the Arduino code.
- Now install the IR Remote library in the Arduino IDE. You can download it from here.
- Upload the code to the Arduino board.
Now your Universal remote is ready for use.

-65 %
The Arduino Nano is a small, complete, and breadboard-friendly board based on the ATmega328 (Arduino Nano 3.x) or ATmega168 (Arduino Nano 2.x). It has..
₹266 ₹756

-51 %
Details and Specifications:
This is 10pcs of each (total 30 pcs) jumper cable Dupont wire for Arduino.
High quality and in good working condit..
₹49 ₹99

-50 %
1K ohm Carbon Film Resistors are typical axial-lead resistors, which have much better temperature stability and provide lower noise, and are generally..
₹1 ₹2

Out Of Stock
TSOP1738 is an infrared receiver tuned to receive IR of frequency 38 kHz only. It is perfect for making obstacle sensors and to read signals from most..
₹25

Tactile Push Button Switch is widely used as a standard input “buttons” on electronic projects. These work best when you mount it on PCB but can also ..
₹4

-57 %
The KY-005 Infrared Transmitter Module consists of just a 5mm IR LED. It works together with the KY-022 IR receiver module. Compatible with popular el..
₹34 ₹79

Leave a Comment