
Hello,
In this article, we are going to learn more about accelerometers and we will interface the accelerometer ADXL335 with Arduino.
Hardware Required
Software Required
Introduction
-
An accelerometer is a tool that measures the vibration, motion, or acceleration of a structure. Cameras and smartphones these days use an accelerometer consisting of an axis-based motion sensor. It is an electromechanical device that measures either static or dynamic acceleration. Acceleration, as we know, is the measure of change in velocity upon a given time.
-
Accelerometers are used in the compass app you use on your phone. The motion sensors in accelerometers can detect earthquakes too. Another example is when the accelerometers measure the gravitational pull to determine at which angle is the device being titled.
Working principle of Accelerometer
-
When the accelerometer is in equilibrium, it measures the acceleration to be 1g which is equivalent to 9.81 m/s2. The accelerometers usually are multiple axes rather than single-axis which helps determine their movement in three dimensions. There are generally two types of accelerometers: a piezoelectric one and a capacitive one.
-
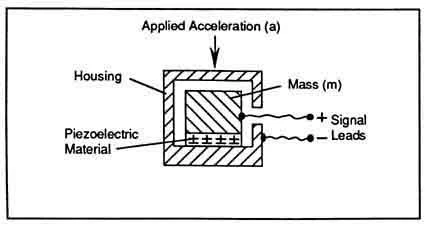
The piezoelectric sensor works on the principle that when pressure is applied to the piezoelectric material it generates an electric charge. So the accelerometer consists of microscopic piezoelectric particles with a mass mounted on it. As the acceleration will exert force on the piezoelectric material, this will in turn generate a charge which will be converted into the value of velocity, and orientation is based on the amount of charge generated.
- The capacitive accelerometer work based on the principle that when the distance between the plates changes, the capacitance also changes. There are two types of capacitive accelerometers. One type includes two parallel movable plates connected to a spring. As the acceleration force is applied to the plates, the distance between the plates changes which changes the overall capacitance. This change in capacitance is used to calculate the acceleration and orientation of the object.
- The second type of accelerometer is called the differential capacitive accelerometer. Here there are multiple capacitors used to measure the acceleration of the object.
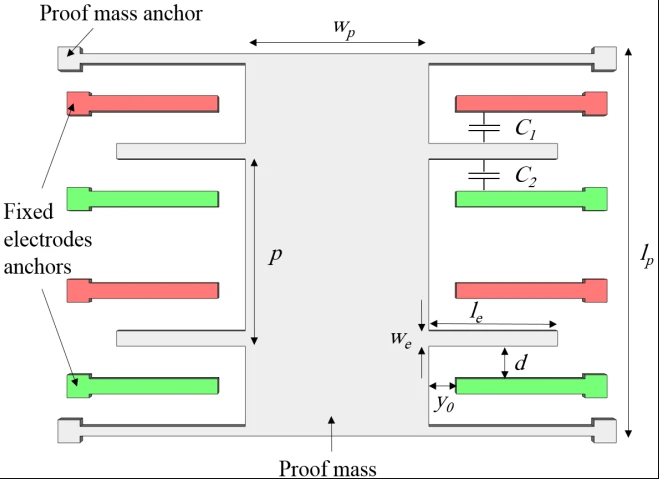
- As shown in the above picture, the capacitors are fixed on to the fixed electrode anchors, and the proof mass is movable. As the acceleration is applied to the sensor, the mass shifts changing the distance between the capacitors and the electrodes.
- This consequently changes the capacitance of the capacitor. The change in capacitance is measured and the acceleration value is calculated based on the capacitance.
- The animation below shows how the mass will move as the acceleration is applied to it.
- Capacitive accelerometers use silicon-based materials.
.gif)
Working principle of the accelerometer ADXL335
- There are generally two types of capacitive accelerometers right now. One is MEMS (Micro electro mechanical sensor). MEMS generally have a silicon-based material with a mass attached to it and it is integrated into a circuit. As the acceleration is applied, the mass moves, and thus the silicon material also moves. This creates a charge in the circuit. The charge is used to calculate the acceleration.
- The other type is analog accelerometers. They work on two different principles which we discuss above: piezoelectric sensing and capacitive sensing. ADXL335 works on the principle of capacitive.
- ADXL335 is a capacitive accelerometer. It works on the principle that when the acceleration is applied to the sensor, the capacitance inside the sensor changes. This change in capacitance is then used to measure the acceleration of the object.
- This is a 3-axis accelerometer. So it can be used to calculate all the accelerations in three dimensions.
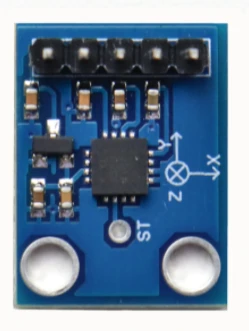
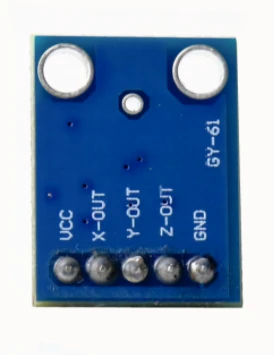
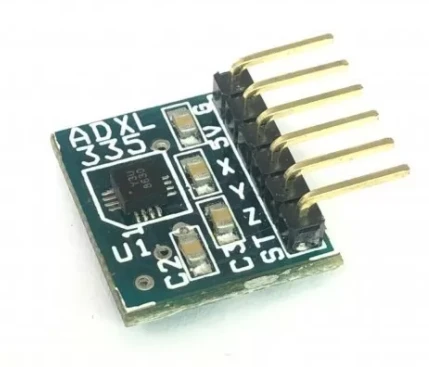
- The ADXL335 sensor has 6 pins and an integrated chip on the front of the board. The pins are soldered at the back of the board.
- VCC pin is used for the power supply.
- X-out is the output to measure the acceleration along the x-axis.
- Y-out is the output to measure the acceleration along the y-axis.
- Z-out is the output to measure the acceleration along the z-axis.
- GND is the ground pin
- ST pin located above the integrated chip is the self-test feature. This self-test feature allows us to check the functioning of the accelerometer in the final model.
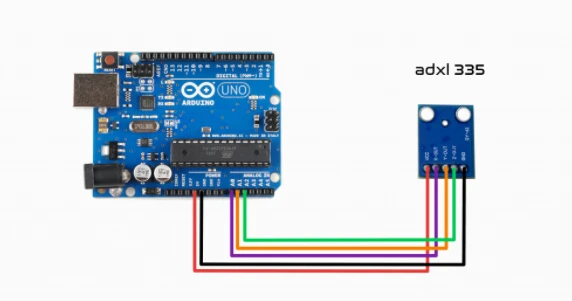
Interfacing with Arduino
|
Pins on Arduino Uno |
Pins on ADXL335 |
|
3.3V |
VCC |
|
A0 |
X-out |
|
A1 |
Y-out |
|
A2 |
Z-out |
|
GND |
GND |
Arduino Code
const int xInput = A0;
const int yInput = A1;
const int zInput = A2;

// initialize minimum and maximum Raw Ranges for each axis
int RawMin = 0;
int RawMax = 1023;

// Take multiple samples to reduce noise
const int sampleSize = 10;

void setup()
{
    analogReference(EXTERNAL);
    Serial.begin(9600);
}

void loop()
{
    //Read raw values
    int xRaw = ReadAxis(xInput);
    int yRaw = ReadAxis(yInput);
    int zRaw = ReadAxis(zInput);

    // Convert raw values to 'milli-Gs"
    long xScaled = map(xRaw, RawMin, RawMax, -3000, 3000);
    long yScaled = map(yRaw, RawMin, RawMax, -3000, 3000);
    long zScaled = map(zRaw, RawMin, RawMax, -3000, 3000);

    // re-scale to fractional Gs
    float xAccel = xScaled / 1000.0;
    float yAccel = yScaled / 1000.0;
    float zAccel = zScaled / 1000.0;

    Serial.print("X, Y, Z  :: ");
    Serial.print(xRaw);
    Serial.print(", ");
    Serial.print(yRaw);
    Serial.print(", ");
    Serial.print(zRaw);
    Serial.print(" :: ");
    Serial.print(xAccel,0);
    Serial.print("G, ");
    Serial.print(yAccel,0);
    Serial.print("G, ");
    Serial.print(zAccel,0);
    Serial.println("G");

    delay(200);
}

// Take samples and return the average
int ReadAxis(int axisPin)
{
    long reading = 0;
    analogRead(axisPin);
    delay(1);
    for (int i = 0; i < sampleSize; i++)
    {
    reading += analogRead(axisPin);
    }
    return reading/sampleSize;
}
- Upload the code to the Arduino board. Perform the circuit diagram.
- You will now see the results of the angles and the acceleration on the serial monitor.
- This will show you the orientation and the forces on the accelerometer.
Applications of accelerometer
- Smartphones include an accelerometer which is used in features like auto-rotate and games etc.
- Smartwatches have an accelerometer to track your speed and orientation during activities like running, cycling, swimming, volleyball, cricket, football, etc.
- Cameras use accelerometers for the stabilization of their pictures and videos.
- Drones use accelerometers to increase their stability during flight.
- Accelerometers are widely used to measure seismic activity all over the world.
- In this article, we learned what is an accelerometer, the construction behind various accelerometers, the working principle of an accelerometer, and interfacing with Arduino. This sensor is embedded in our lives profoundly and will be used in more and more applications for the days to come. I hope you learned something from this blog and I hope you liked it. Thank you.


Leave a Comment