
For your Arduino projects, the Keyestudio Multi-purpose Shield V1 is a useful and adaptable accessory. This shield offers a one-stop shop for a variety of applications because it is jam-packed with parts like the DHT11 sensor, LM35 temperature sensor, buzzer, humidity sensor, IR receiver, potentiometer, LED, switch, and LDR (light-dependent resistor). We'll give you an overview of the shield and its main parts in this blog post.
What's Inside the Box
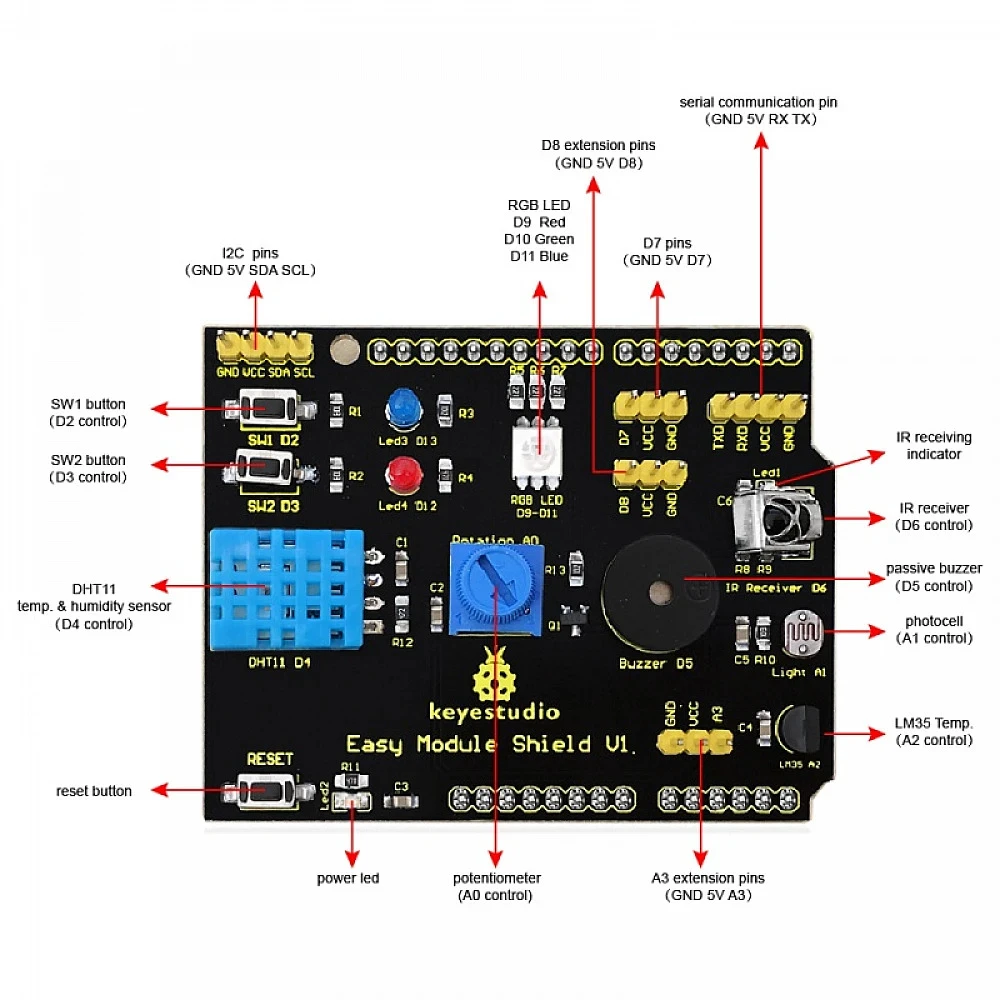
The Keyestudio Multi-purpose Shield V1 comes with a set of essential components that can be used for a wide range of projects. Here's what you'll find on this shield:
-
DHT11 Sensor: This digital temperature and humidity sensor allows you to monitor the environmental conditions in your projects.
-
LM35 Temperature Sensor: The LM35 sensor is a linear temperature sensor that can be used to measure temperature with high accuracy.
-
Buzzer: Create audio alerts, alarms, or simple melodies with the onboard buzzer.
-
Humidity Sensor: In addition to the DHT11, this shield includes a separate humidity sensor to provide humidity data.
-
IR Receiver: With the IR receiver, you can receive and decode infrared signals from remote controls.
-
Potentiometer: Adjust resistance values with the potentiometer for applications like controlling LED brightness.
-
LED: Use the LED to indicate various states or create visual feedback in your projects.
-
Switch: A simple push-button switch can be used to trigger actions or change settings.
-
LDR (Light-Dependent Resistor): Detect ambient light levels with the LDR for applications such as automatic lighting control.
Applications and Projects
The Keyestudio Multi-purpose Shield V1 is ideal for both beginners and experienced Arduino enthusiasts. Here are a few project ideas to get you started:
-
Weather Station: Combine the DHT11 and LM35 sensors to create a simple weather station that displays temperature and humidity readings.
-
Infrared Remote Control: Use the IR receiver to decode signals from your TV remote and control other devices or functions with your Arduino.
-
Buzzer Alarm: Create a security system with the buzzer to sound an alarm when motion is detected.
-
Light Control: Use the LDR to control LED brightness depending on ambient light conditions, saving energy.
-
Potentiometer-based Volume Control: Implement a volume control system for audio projects using the potentiometer.
-
Interactive LED Display: Build an interactive LED display that responds to button presses with the switch.
Getting Started
To begin using the Keyestudio Multi-purpose Shield V1, follow these simple steps:
-
Attach the Shield: Stack the shield on top of your Arduino board.
-
Load the Appropriate Libraries: Depending on the components you want to use, install the necessary libraries and dependencies in your Arduino IDE.
-
Write Your Code: Start coding your project based on the sensors and components you want to utilize.
-
Upload the Code: Upload your code to the Arduino board.
-
Test and Experiment: Observe the results and experiment with different configurations to achieve your desired outcomes.
For every Arduino enthusiast, the Keyestudio Multi-purpose Shield V1 is an invaluable tool. It makes the process of developing interactive and varied projects easier with its wide range of components.
Therefore, this shield is an essential addition to your Arduino toolkit, whether you're an experienced maker searching for a practical solution or a beginner looking to learn.


Leave a Comment