02 Jan

Hello,
In this tutorial, we are going to build a sun-tracking solar panel using Arduino.
Hardware Required
Software Required
Importance of a Sun tracking system
- Every season comes with different changes. Changes in the length of day and night, changes in the movement of the sun, changes in the temperature.
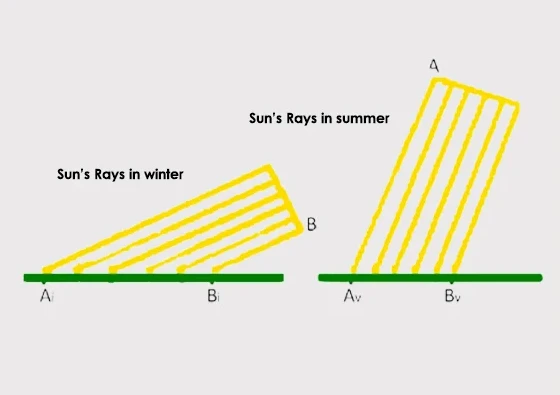
- The above picture shows the angle of incidence of sun rays at noon. This shows how much more efficient it would be if the solar panel could move and align itself according to the angle of incidence of the sun rays.
- Therefore a solar panel system needs to have a sun tracking system integrated into it.
Types of Sun tracking system
- Single-axis tracking: In this type of system, only one motor is used and the solar panel can move only around one axis.
- Dual-axis tracking: In this type of system, the solar panel can adjust itself on two axes, one vertical and one horizontal. This system is more efficient than the single-axis system.
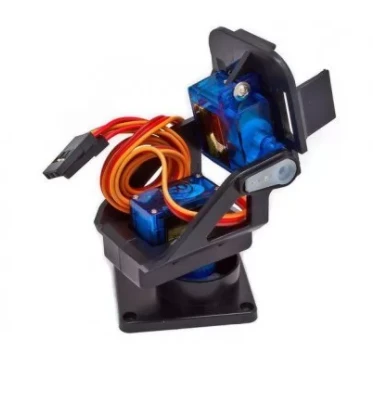
- In this project, we are going to use a two-axis gimbal as the tracking system for the solar panel. We can stick the solar panel on the surface of this gimbal.
Circuit Diagram
- The negative terminals of 4 LDR Sensors are connected to the analog pins A0, A1, A2, A3. The positive terminals are connected to the positive bus on the breadboard.
- The positive and negative terminals of both the servos will be connected to the positive and ground bus on the breadboard.
- The Signal pins on the Servo motors are connected to digital pins 9 and 10.
Working concept
- The working concept of this project involves three main components: the LDR is used for the sensing part, the Arduino board is used for the processing part and the servo motors are used for the actuation part.
- The LDR senses the light and gives back the analog data to the Arduino board. 4 LDR sensors are used in four different directions. Top, Bottom, Right, Left. The intensity of the light on all 4 sensors is used to calculate the movement of the gimbal.
- These calculations are done by the Arduino board. If the intensity on the right side is more then the gimbal will move towards the right and similarly if the intensity on the top side is more then the gimbal will move towards the top.
- The movement of the gimbal is done by rotation of the servos. The commands are given to the servos as per the calculation done by the Arduino board.
Arduino Code
- Upload the code to your Arduino board.
Now your Sun tracking solar panel is ready to go.

Hot
-59 %
The Arduino Uno R3 Compatible board is an electronic hardware device used to build and program electronic circuits and projects. The board is based on..
₹528 ₹1,299

-17 %
The Micro Servo 9G is lightweight, high-quality and lightning-fast. The servo is designed to work with almost all the radio control systems. It is wit..
₹123 ₹149

This is 40pcs of each (40 M-M, 40 M-F, 40 F-F) jumper cable Dupont wire for Arduino.
Specifications:
This is 40 pcs of each (total 120 pcs)..
₹159

Out Of Stock
Features:
Polycrystalline silicon, with higher transfer efficiency output and environment-friendly
Suitable for charging a cellphone or DIY ch..
₹755

-37 %
This is 2 Axis Pan Tilt Brackets For Camera/Sensors for Servo SG90S MG90S which is based on 2 axis pan and tilt mechanism for mounting wireless/ wired..
₹75 ₹119

If you need a way to sense the level of ambient light then there is no easier way to do it without an LDR/photo-resistor. The resistance of Light Sens..
₹38

Leave a Comment