-1060x400h.webp "How to make Fingerprint Locker with Arduino")
Hello,
In this tutorial, we are going to learn how to make a Fingerprint locker using Arduino.
Hardware Required
1. Door Lock
2. Fingerprint Sensor
3. Arduino UNO
4. Jumper wires
5.12v Dc Power Supply Adapter
6. IRFZ44N Power MOSFET
Software Required
Working principle of the Fingerprint sensor
-
Generally, the fingerprint scanner works in two ways. First is the optical one, another is the capacitive one. The optical fingerprint has a light inside it. This light will be flashed to the finger and it will capture the picture digitally.
-
Then it converts this fingerprint pattern into a source code of 0 and 1. This code is unique as each fingerprint is unique. And this code can be used to identify the fingerprint. If the fingerprint source code matches the authorized one, then and only then access is granted by the sensor to the system.
-
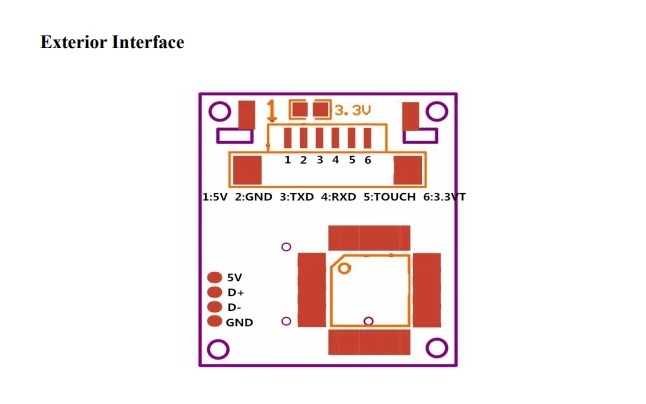
The fingerprint sensor which we are going to use in this project is an optical sensor. R307 optical fingerprint scanner.
R307 Optical fingerprint scanner
-
This fingerprint scanner involves two processes. One is fingerprint enrollment. After the fingerprint has been enrolled and stored. The second process is fingerprint matching.
-
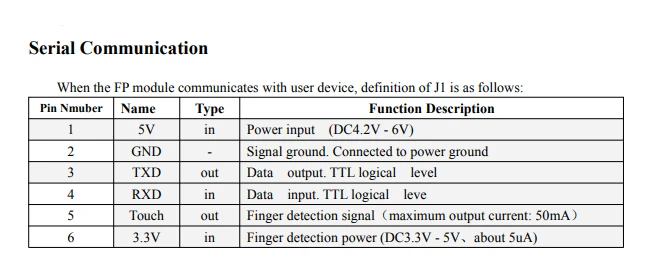
The exterior of the fingerprint sensor is as follows:
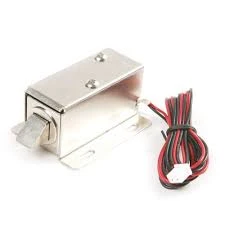
Solenoid door lock
-
This 12V Electromagnetic Solenoid Lock can be used for locking storage shelves, file cabinets, etc. You can control the opening and closing of the lock with the help of programming. But for the lock to work, it must be connected to a power supply as this is an electromagnetic lock. The lock works as the current disconnects, and it will unlock as the instant power is on.
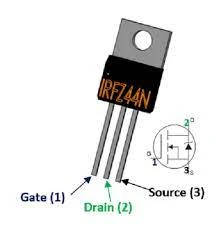
IRFZ44N MOSFET
-
IRFZ44N is an advanced HEXFET Power MOSFET that utilizes advanced processing techniques to achieve extremely low on-resistance per silicon area. This benefit, combined with the fast switching speed and ruggedized device design that exFAT power MOSFETs are well known for, provides the designer with an extremely efficient and reliable device for use in a wide variety of applications.
Circuit Diagram
-
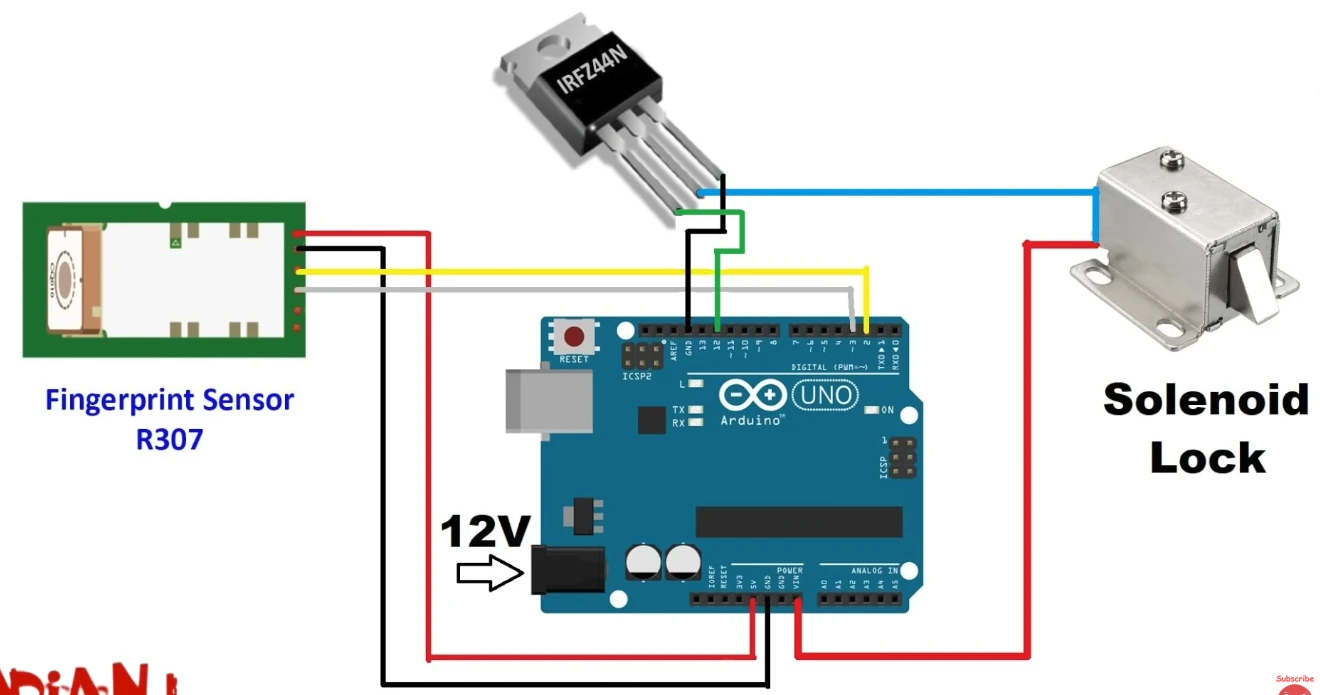
The circuit diagram for the Fingerprint locker is mentioned below.
-
The gate and the source pins on MOSFET are connected to the Arduino Uno on GND and digital pin 12 respectively. The drain pin is connected to the solenoid lock.
-
The Tx and Rx pins on the fingerprint sensor are connected to the digital pins 2 and 3 respectively. 5V is connected to 5V and GND to GND.
-
The positive terminal on the solenoid lock is connected to the Vin on the Arduino Uno.
Working Concept of the Fingerprint locker
-
As we now know, the fingerprint scanner works in two processes. Fingerprint enrollment and matching. Similarly, it also works in the same way in this project.
-
At first, we have to store the fingerprint in the sensor via fingerprint enrollment. Once the fingerprint is stored, we can start with fingerprint matching.
-
Whenever the enrolled print matches the current fingerprint, the scanner sends those signals to the Arduino Uno. The Arduino in turn sends the signal to the solenoid door lock to unlock if the fingerprint matches.
-
An IRFZ44N MOSFET has been connected between the solenoid lock and the Arduino Uno. A MOSFET is a semiconductor device that is generally used to amplify electronic signals in devices.
Arduino Code
-
The circuit diagram and libraries can be downloaded here.
-
Below given is the code to save the fingerprint onto the Arduino board.
-
Upload the first code to the Arduino board, this code is for fingerprint enrollment. Open the Serial monitor after uploading the code, Enroll your finger image to the Arduino board.
-
The Arduino can take data for up to 127 different fingerprints.
-
Once you are done with the enrollment, then upload the second code to the Arduino board. This is the final code for the Fingerprint locker using Arduino.
Now your Fingerprint locker is ready to use!


Leave a Comment