25 Jan

Hello,
In this tutorial-based article, we are going to learn more about the Sound sensor and its interfacing with Arduino.
Hardware Required
Software Required

- In today's world of automation, sensors are a vital part of any automation system. And the sound sensor is one of the most used sensors among all of them. The sound sensor is generally used to detect the intensity of the sound.
- Sound is a type of energy that travels in the form of waves. These waves are produced by mechanical vibrations. The type of frequency of the wave generally determines the sound.
- The sound sensor consists of a microphone to detect the sound, a potentiometer to adjust the sensitivity, and an audio amplifier to amplify the sound signals before sending it to the Arduino board.
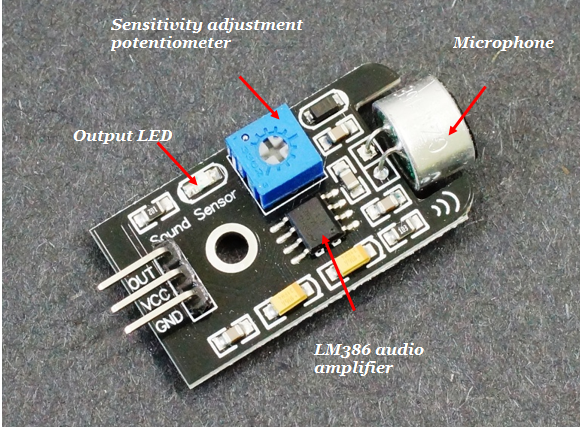
- The potentiometer sets the threshold value of the sound. The output of the sensor will be HIGH until the intensity of the sound crosses the threshold value. After the sound crosses the threshold value, the output of the sensor will be LOW.
Specifications
- Operating Voltage: 3.3 to 5V.
- The operating current is 4-5 mA.
- Voltage gain 26dB.
- Sensitivity : 52-48 dB.
- Impedance: 2.2k Ohm.
- Frequency : 16-20kHz.
- Signal/Noise ratio: 54 dB.
Working principle
- The sound sensor works on the same principle as the human ear.
- The human ear has a diaphragm. It is a membrane inside the ear which translates vibrations into signals. And then sends those signals into the brain.
- Similarly, a microphone has a magnetic diaphragm and a metal coil attached to it.
- As the sound waves come into the contact with the diaphragm, it starts vibrating and the metal coil turns those vibrations into electrical signals.
- This sensor gives out digital output.
Interfacing with Arduino
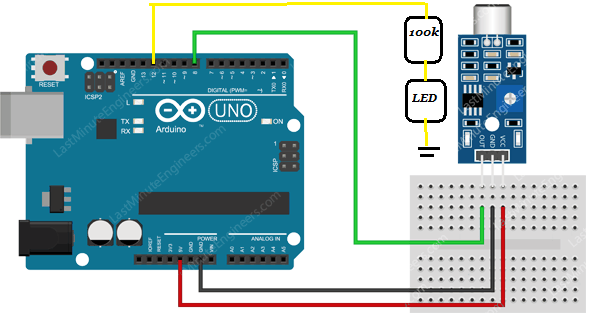
- The output pin of the sensor is connected to digital pin 8. The positive terminal is connected to the 5V pin and the negative terminal is connected to the GND pin.
- The LED is connected to digital pin 12 of Arduino.
Working concept
- The working concept is pretty simple as this is only interfacing.
- The sound travels in the form of waves and when it reaches the magnetic diaphragm, it starts vibrating.
- These vibrations are recorded by the metal coil which is attached to the magnet. This coil converts the vibrations into electrical signals.
- These electrical signals are sent to the Arduino board for processing.
- The Arduino board then sends the data to be displayed on a Serial Monitor.
Arduino Code
const int ledPin = 12;
const int soundPin = 8;

int soundVal = 0;

void setup ()
{
  pinMode (ledPin, OUTPUT);
  pinMode (soundPin, INPUT);
  Serial.begin (9600);
}

void loop ()
{
  soundVal = digitalRead(soundPin);
  if (soundVal == HIGH)
  {
    digitalWrite(ledPin, HIGH);
    Serial.println("Clap detected");
    delay(1000);
  }
  else
  {
    digitalWrite(ledPin,LOW);

  }
 }
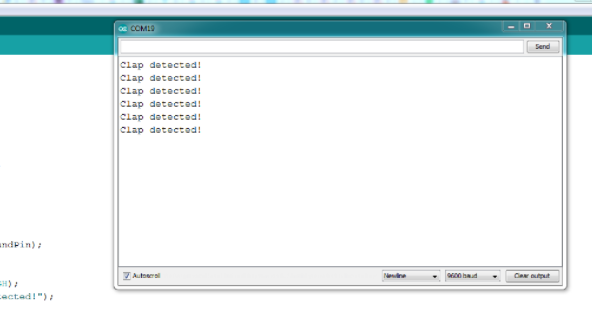
- Upload the code. Open the Serial monitor.
- You should see something like this.
- I hope you learned something about sound sensors from this article and I hope that you enjoyed it. Thank you!

Hot
-56 %
The Arduino Uno R3 Compatible board is an electronic hardware device used to build and program electronic circuits and projects. The board is based on..
₹574 ₹1,299

-55 %
The sound module is the most sensitive to the environment sound intensity, commonly used to detect the intensity of the sound of the surroundings. Whe..
₹50 ₹109

-51 %
Details and Specifications:
This is 10pcs of each (total 30 pcs) jumper cable Dupont wire for Arduino.
High quality and in good working condit..
₹49 ₹99

Leave a Comment